Adventures in Mega Drive Coding Part 5: Palettes and Splitting Tiles
WARNING: These are outdated and obsolete! Instad check out the new >tutorial section<. There you'll learn everything you could here but better!
Note: These are not tutorials, I'm just chronicling my progress as I figure stuff out. Some of the things I do might make an experienced Mega Drive coder cry out in anguish. Feel free to use these posts to guide yourself along, but be aware I might be leading you off a cliff!
Welcome back to Adventures in Mega Drive Coding, where I play around with SGDK in an attempt to get a Mega Drive game done this year!
This time I want to start off by fixing something I messed up. In part 3 we did this to properly display our tiles:
VDP_loadBMPTileData(ground.image,1,1,1,1);
VDP_loadBMPTileData(earth.image,2,1,1,1);

VDP_setPalette(PAL1, ground.palette->data);
VDP_setPalette(PAL2, earth.palette->data);
We saved one palette per tile, which was very inefficient. One palette can hold up to 16 colors, but ground only uses 6. Even worse, earth uses only one…and it’s already defined in ground’s palette! So it would make a lot more sense to have both tiles use the same palette. However, trying the following…
VDP_setPalette(PAL1, ground.palette->data);
VDP_setPalette(PAL1, earth.palette->data);

VDP_fillTileMapRect(PLAN_A,TILE_ATTR_FULL(PAL1,0,FALSE,FALSE,1),0,21,40,1);
VDP_fillTileMapRect(PLAN_A,TILE_ATTR_FULL(PAL1,0,FALSE,FALSE,2),0,22,40,7);
…resulted in this:
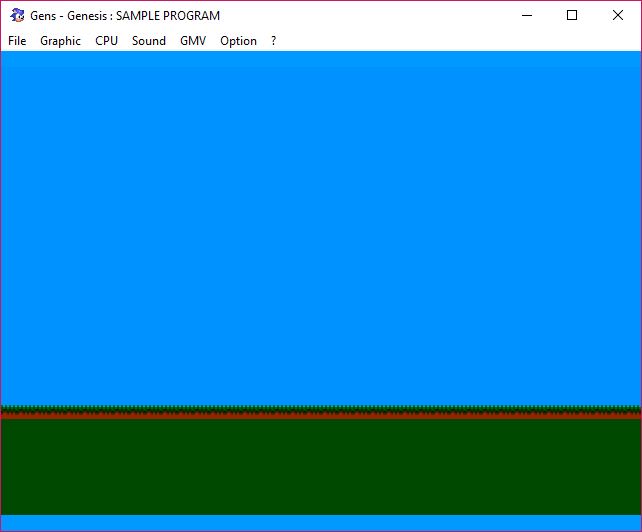
The earth tiles are green instead of brown, so they obviously use the wrong color from the palette. I spent some time digging around SGDK to figure out how to grab the right color from the palette but didn’t find a solution.
Then I realized I was being an idiot.
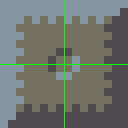
I already mentioned that you could only use 16 colors per tile. When creating my tiles in Photoshop I was using indexed mode, which creates a color table along with the file. Each pixel in the image then basically “points” to its color in the table. For example, this is the table of the ground file:
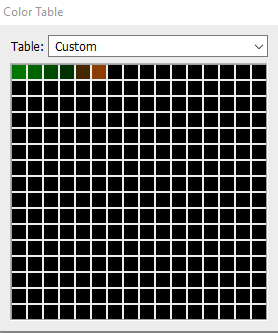
These are also the colors that SGDK imports for each tile when using VDP_setPalette(PAL1, ground.palette->data);. Now here’s where I messed up: I created the earth tile using a different color table. To be more specific, I created a new file in Photoshop, filled the area with brown, then saved that as an indexed image. This resulted in a color table that only had one color: Brown. Each pixel in this file pointed to this color, which was at the first (and only) position of the table. So when I tried to use the palette of the ground tile, SGDK used the first color in the ground table…and as you can see from the image above, that’s green.
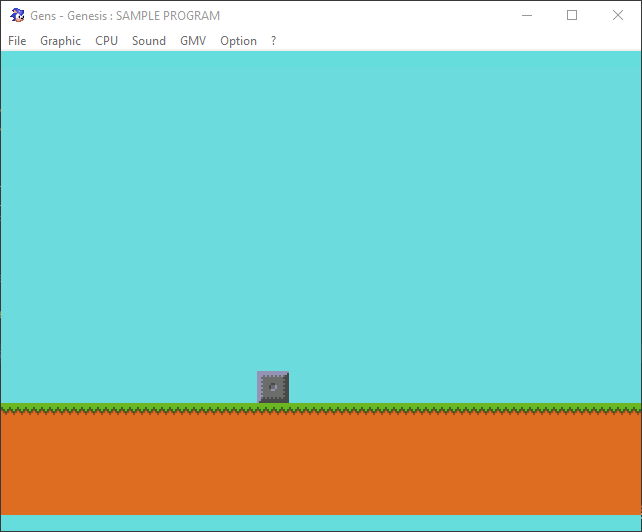
So the fix was simple: I simply recreated the earth tile, this time using the same color table as ground. And now when I use PAL1 to draw both tiles I get this:
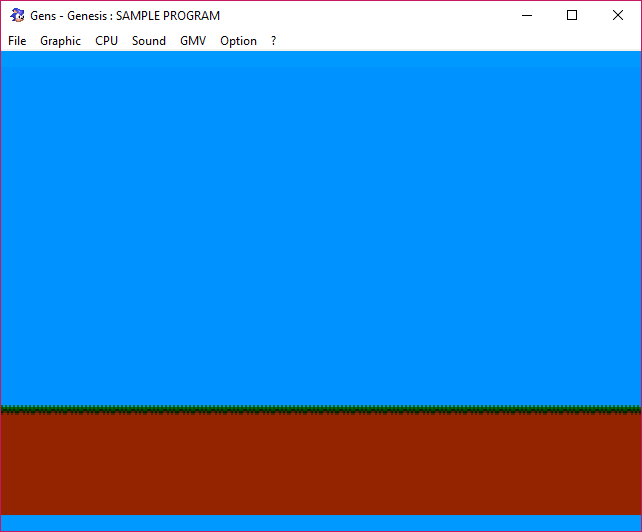
Success! It’s a dumb mistake to make, so I thought I’d share it.
Splitting Tiles
I originally wanted to move on to sprites now, but I stumbled across another very useful tile function: VDP_fillTileMapRectInc. Sounds a bit convoluted but it’s worth taking a look at. It can save us a lot of time.
All functions so far placed one particular tile on the screen, the ID of which we passed into the respective function. However, as you know, many times a game’s background consists of a whole pile of different tiles that are arranged to create a larger image. Just look at this temple from Sonic the Hedgehog’s Marble Zone (shoutout to Spriters Resource):
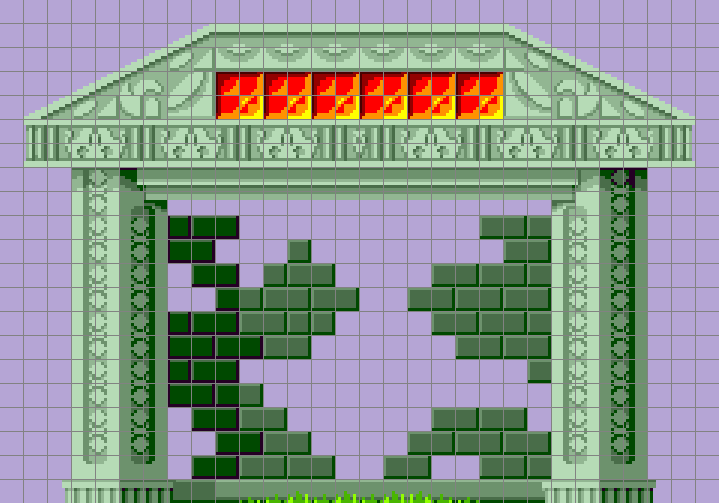
This whole structure is assembled from 8x8 tiles. Naturally we could load each of these tiles individually, then build the temple brick by brick…or we could just let VDP_fillTileMapRectInc do its thing. Since a whole temple would be a bit much for now, let me illustrate using this stone block I’ve made. It is made up of 4 tiles:
First, we need to add the block to our resources file by adding the following line:
BITMAP block "bigblock.bmp" 0
Next, we need to grab the dimensions of the image. The reason for that should become clear in a minute.
u16 blockW = block.w;
u16 blockH = block.h;
These two variables now hold the width and height of the block image in pixels. In our case both are 16. Finally, we call VDP_loadBMPTileData to turn the image into tiles. However, this time we’re doing things a bit differently:
VDP_loadBMPTileData(block.image,3,blockW/8,blockH/8,blockW/8);
As you can see we’re passing the dimensions into VDP_loadBMPTileData but divided by 8. So what’s going on?
Basically, VDP_loadBMPTileData can split an image into tiles. So far we’ve just entered 1 for each value, since we were always importing just a single 8x8 pixel image, meaning there was no reason to split anything. This time however our image consists of 4 tiles, so we need to make sure that all of these get imported. So we pass in the width and height of the image in tiles, which in our case would be 16/8 = 2. This has VDP_loadBMPTileData create a total of 4 tiles which are stored in the VRAM starting at index 3. In other words, the tiles of our block image are now stored at indexes 3,4,5 and 6 of the VRAM.
We could now access and place each of these tiles individually, but that’s still too much work. This is where the aforementioned VDP_fillTileMapRectInc comes in. This function fills a specified rectangle with a range of tiles, starting at a specific index. If that sounds confusing let’s just do it first:
VDP_fillTileMapRectInc(PLAN_B,TILE_ATTR_FULL(PAL1,0,FALSE,FALSE,3),16,19,2,2);
For reference, its signature is void VDP_fillTileMapRectInc(VDPPlan plan, u16 basetile, u16 x, u16 y, u16 w, u16 h);. Here’s what we’re doing: We’re drawing a rectangle at tile position 16,19 with a width and height of 2. The first tile we want drawn is stored at index 3. The function then increments that number for each tile it draws, and it goes from left->right, then top->bottom.
So basically: The first tile (at index 3) is drawn at position 16,19. The second tile (at index 4) is drawn at 17,19, the third tile (index 5) is placed at 16,20 and the final tile (index 5) at 17,20. And this is the result:
(I’ve adjusted the ground sprites and overall palette a bit, so it looks a bit nicer.)
Phew, that was a mouthful. It took me a while to get the hang of all this, so feel free to ask questions if you’re as confused as I was. Next time I’m hoping to move on to sprites, so we can get closer to making an actual game! Also feel free to follow me on Twitter @ohsat_games if you want to read more words by me.
And finally: I’ve written a short tutorial on how to set up Visual Studio Code for use with SGDK, giving you features like auto-complete and compilation via keyboard shortcuts Check it out if you’re interested!
Check out the rest of this series!

Want To Buy Me a Coffee?
Coffee rules, and it keeps me going! I'll take beer too, though.

Related Posts


Go! Go! Pogogirl Is Coming to Mega Drive!
It is finally happening: Go! Go! PogoGirl is coming to the Sega Mega Drive!
HaxeFlixel Tutorials!
If you’ve popped over to the tutorial section recently you might have noticed that I’ve added my very first HaxeFlixel tutorial! It shows how to implement a simple, pixel-perfect 2D water shader which I used for Go! Go! PogoGirl. But a few of you might be wondering what a HaxeFlixel is. Well, it’s a 2D game framework that is as powerful as it is underrated! It runs on the (also underrated) Haxe language, is extremely well documented, open source, and has built-in functions for almost anything you’d need.
Comments
By using the Disqus service you confirm that you have read and agreed to the privacy policy.
comments powered by Disqus