Simple Password System
NOTE:
A new version of SGDK has recently been released.
It has probably introduced some breaking changes. If something doesn't seem to be working, post it in the comments and I'll see what I can do to update the tutorial.


Thank you to my excellent patron Richard, who suggested this tutorial!
Back in the day before battery saves and memory cards, progress in games was saved using passwords. In those days, a lot of time was spent with a pen, a scrap of paper and a series of numbers, letters, or, if the game was particularly evil, symbols. But you had to do it, because you weren’t gonna give up all your progress, right? Passwords are a part of the retro experience, so let’s see how to make our own basic password system using SGDK!
At a basic level, a password encodes progress in a game. What that means and how much is saved is basically up to you. Usually, a password at least stores the current level number, but some games also store the number of lives, items collected or whatever else needs to be kept track of. In this tutorial, we’ll stick to a simple password that sends players to a specific level when they enter it. Let’s go!
First, we’ll have to create a screen on which to enter the password. The base code here will be based on my menu tutorial, so I’ll be keeping the explanations brief. Feel free to check out that tutorial if you need a more detailed explanation!
Making the Menu
First, some setup. We’ll create a struct for each possible letter of the password, which will be limited to A, B and C here. Then we create an array with these letters, which will serve as the basis of our menu:
typedef struct
{
u16 x;
u16 y;
char label[2];
} Option;
#define NUM_LETTERS 3
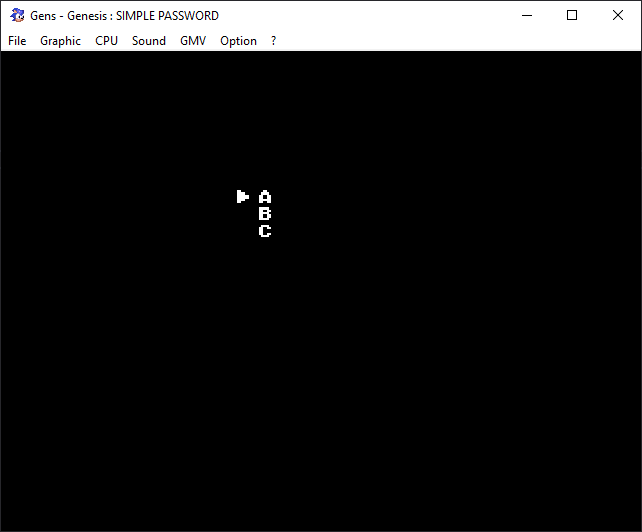
Option options[NUM_LETTERS] = {
{16, 8, "A"},
{16, 9, "B"},
{16, 10, "C"},
};
We’ll also need a variable to track the currently selected letter, as well as a variable to store the cursor sprite:
u8 currentIndex = 0;
Sprite *cursor;
Now, let’s draw the letters on the screen so that players can select them. Jump into main() and add the following lines:
u16 i = 0;
for(i; i < NUM_LETTERS; i++){
    Option o = options[i];
    VDP_drawText(o.label,o.x,o.y);
}
Now, let’s add our cursor. Download the cursor graphic here:
Click to download the cursor sprite
Put it in the res folder of your project, create a resources.res file in the same folder, and add the following line to it:
SPRITE gfx_cursor "cursor.bmp" 1 1 NONE 0
Then include the resources in your project by adding this at the top of main.c:
#include <resources.h>
Now initialize the sprite engine and add the cursor graphic in main(), after we’ve drawn our letters:
SPR_init(0, 0, 0);
cursor = SPR_addSprite(&gfx_cursor, 0, 0, 0);
And, finally, update the sprite engine every frame by adding a line to your main game loop:
while (1)
{
    SPR_update();
    SYS_doVBlankProcess();
}
Alright, now we got letters on the screen, as well as a cursor (in the wrong position). Next, we’ll create some functions to let players pick and select letters for the password.
First, a function to update the cursor position:
void updateCursorPosition(){
    SPR_setPosition(cursor, options[currentIndex].x*8-12, options[currentIndex].y*8);
}
You’ll want to call this function in main() after creating the cursor sprite, so that it’s shown at the correct position right away.
Next are two functions that will be called when we’re moving the cursor up or down in our menu:
void moveUp(){
    if(currentIndex > 0){
        currentIndex--;
        updateCursorPosition();
    }
}

void moveDown(){
    if(currentIndex < NUM_LETTERS-1){
        currentIndex++;
        updateCursorPosition();
    }
}
To actually allow users to move the cursor, we’ll need an event handler for joypad input.
void joyEventHandler(u16 joy, u16 changed, u16 state){
    if (changed & state & BUTTON_UP)
    {
        moveUp();
    }
    else if(changed & state & BUTTON_DOWN){
        moveDown();
    }
}
This handler of course needs to be hooked up at the beginning of main() with:
JOY_init();
JOY_setEventHandler(&joyEventHandler);
Phew! That was a lot in a very short time. Again, if you need a more detailed breakdown on how all this works, check out my menu tutorial.
The Password
Now we can move the cursor between the various letters. Next, let’s add the actual password functionality. For this, we’ll first need a couple of defines and a variable outside of main():
#define PASS_X 16
#define PASS_Y 4
#define PASS_LENGTH 3
char passString[PASS_LENGTH+1] = "";
The string passString will contain the password currently being entered by the player. It is of length PASS_LENGTH (plus one for the null terminator), and will be drawn at tile-position PASS_X,PASS_Y.
As we’ll draw this string on screen quite a lot, let’s make a small function that does it for us:
void updatePassString()
{
    //Update the passString
    VDP_drawText(passString,PASS_X,PASS_Y);
}
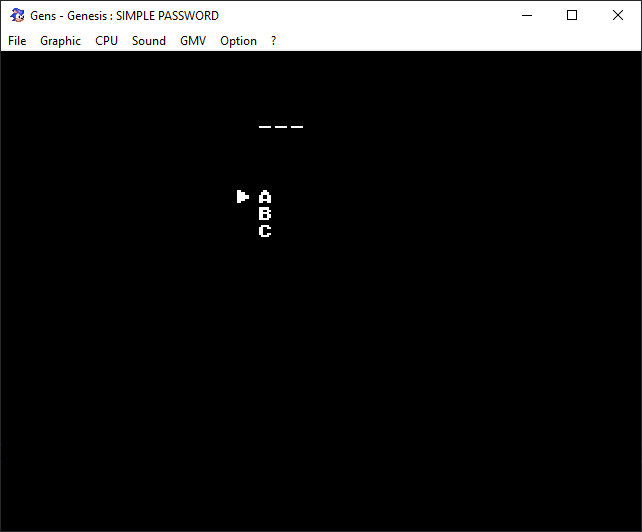
Also, let’s draw three hyphens where the password is gonna go, to indicate the number of letters to players. In main(), add this after drawing our cursor:
VDP_drawText("---",PASS_X,PASS_Y);
Alrighty, time to get serious. We’ll need to let players enter letters for the password, so add the following bit of code to our joyEventHandler:
if(changed & state & BUTTON_C)
{
	select();
}
And now we actually create the select function we’re calling here. This function will add the selected letter to the current password string, and check if it is correct once all letters have been entered. The whole function looks like this:
void select(){
    //If all characters have been entered, check password
    if(strlen(passString) == PASS_LENGTH)
    {
        checkPassword();
    }
    else
    {
        //Concatenate the letter to the passString
        strcat(passString,options[currentIndex].label);
        updatePassString();
    }
}
As you can see, we use strlen to check the current length of the passString. If we’ve already entered 3 letters (which is our PASS_LENGTH), we call checkPassword, which we’ll create in a second. If the password isn’t complete yet, we use the strcat function to concatenate the selected letter to the passString. We also call updatePassString to draw the entered letter on screen.
Next is the checkPassword function, which will check the entered password and do things depending on whether it was correct or not. In this tutorial we’ll simply draw messages on screen, but in a real game you’d of course be actually loading the appropriate level.
The function is basically just a big if-statement and looks like this:
void checkPassword()
{
    //Check the password and do things depending on whether it's correct or not
    if(strcmp(passString,"BAC") == 0)
    {
        VDP_drawText("LEVEL 2",PASS_X,16);
    }
    else if(strcmp(passString,"AAC") == 0)
    {
        VDP_drawText("LEVEL 3",PASS_X,16);
    }
    else
    {
        VDP_drawText("WRONG",PASS_X,16);

        //If it's wrong, clear the pass string and put placeholders back
        passString[0] = '\0';
        VDP_drawText("---",PASS_X,PASS_Y);
        updatePassString();
    }
}
We use the string compare function strcmp, which returns 0 when two strings are identical. In this case, a password of BAC will take us to level 2, while AAC will take us to the third level. If neither of these passwords were entered, we show an error message. We also reset the passString to null, and redraw the placeholders on screen, so that players can try again.
And wouldn’t you know it? We’re done! Compile the game and try it out. Enter a wrong password, press C again to confirm, and you’ll get another try. Enter a correct password this time and voilà!
This approach is as simple as they come, but if you don’t need to encode much information in your passwords, it’s more than enough. An advanced system would dynamically generate passwords by encoding a variety of data (level, lives, items picked up, play time), then scrambling it so it’s harder for players to see how it’s created. When players enter the password, it is then unscrambled, verified and the data extracted. Maybe I’ll cover that in a later tutorial, once I’ve had more experience with that myself, but I hope that this tutorial was useful for you!
If you've got problems or questions, join the official SGDK Discord! It's full of people a lot smarter and skilled than me. Of course you're also welcome to just hang out and have fun!
Join my mailing list!
You'll get notified whenever cool stuff happens!
Take It to the Next Level!
Become an excellent patron on Patreon and snatch yourself some kickass perks such as early access, early builds, exclusive updates and more!
Want To Buy Me a Coffee?
Coffee rules, and it keeps me going! I'll take beer too, though.
Check out the rest of this tutorial series!
Comments
By using the Disqus service you confirm that you have read and agreed to the privacy policy.
comments powered by Disqus