HF Breakout 1 - Anatomy of a Project


Welcome to another HaxeFlixel tutorial! This time we’ll learn how to create a Breakout game from scratch.
This tutorial is meant for beginners, so we’ll take our time and go through some of the basics of HaxeFlixel. You’ll need to have HaxeFlixel installed and set up before you start, so head on over to the official website and follow the instructions there!
Done?
Alright! Now let’s create a project from the command line and call it HFBreakout, by doing this:
flixel tpl -n "HFBreakout"
Open the project up in your IDE of choice. Like the HF website, I highly recommend VSCode. You can find infos on how to set it up and how to use it on the website as well. Now let’s go and make a Breakout clone!
HaxeFlixel Projects
First, let’s get some basics out of the way and take a look at how a HaxeFlixel project is put together. Inside the source folder of your project folder you’ll find the file Main.hx. This serves as the backbone of the entire project and is the entry point for the game. Open the file up in your IDE.
As you can see, there’s not a lot going on in there; there’s just the line addChild(new FlxGame(0, 0, PlayState));. This line creates a new FlxGame instance and adds it to the OpenFL stage. That might sound weird, but HF is actually based on OpenFL. All the HF code will be contained inside FlxGame, and there should only ever be one instance of it.
The arguments of the function call set the size of the game window and define the starting state. We’ll get to both of those aspects in a second.
You might wonder why we’re setting the size of FlxGame to be 0 and 0. This tells HF to use the sizes defined in the project.xml file, which contains a list of settings and definitions for the project. Open it up; you’ll find it in the root folder of your project.
There’s a lot going on in here, but we’re interested in the following line:
<!--These window settings apply to all targets-->
<window width="640" height="480" fps="60" background="#000000" hardware="true" vsync="false" />
Here, the size of the window is set to 640x480. And that is an important distinction: We’re only defining the size of the window here, not the size of the game. The size of the game is defined by the arguments we pass into the constructor of FlxGame. In our case, we passed in 0,0, which tells HF to make the game the same size as the window — 640x480.
You might wonder why we’d want to make the window a different size than the game. Imagine you want to make a really low-resolution pixel game. In that case you might use a game size of 320x160 or something like that to keep everything nice and chunky. However, on modern screens, a window of size 320x160 is tiny. You wouldn’t be able to see anything. So, in such a case, you’d do addChild(new FlxGame(320, 160, PlayState)) but set the width and height in project.xml to something bigger, like 640x320 or 960x480. HaxeFlixel will then scale up the game to fill the window. That way you can work with your low resolution, but players will still be able to see what’s going on!
For our project we’ll make the game and window size the same (which is the default for a new HF project).
So, in Main.hx we create a FlxGame object of size 640x480. Then it starts the PlayState. This state is defined in the file PlayState.hx, which you can find in the source folder. Open it up!
As you can see, it defines a class called PlayState that extends FlxState. States are the main building block of games. You can use them to organize your game code. A simple game like Galaga (or indeed Breakout) can be done in a single state, but more complex games should be split across multiple states; one for the main menu, one for gameplay, one for cutscenes, one for the inventory screen… Basically, if a part of your game has a completely different functionality than other parts, you should probably stick it into its own FlxState. As we’re only making a simple game, we’ll put all our code inside the PlayState, however.
You can see that two functions are pre-defined in PlayState: We have create and update. The create function is called at the beginning of the state, and is only called once. In here you do everything you need to set up the state: Load graphics, initialize systems, and so on. The update function contains the main game loop. It is called automatically every frame, so here is where the action happens. In update you’ll poll for inputs, move sprites, handle collisions…all the fun stuff.
That’s it for the basic overview of a HF project! One final word before we actually start coding though: I recommend compiling the game for the HashLink target during this tutorial. The code should work for any target, but HashLink is great for testing as it’s quick and rather similar to targeting a native platform (Windows, Linux…).
Now let’s actually code something and make things happen!
Loading Sprites
One of the most important classes in HaxeFlixel is FlxSprite. This class defines an object that has a graphic, a position, velocity and many other properties. Simply put: If it moves, it’s probably a FlxSprite. We’ll use these sprites for almost everything in our game.
Let’s create the paddle to see how it works. First, download the graphic for the paddle from the link below:
Click here to download the paddle graphic
Extract the image file and put it into the assets/images folder of your project. Then, in the PlayState, create a new variable at the top of the class (not inside of create):
var paddle:FlxSprite = null;
This variable will hold our paddle. Then, in create, after the call to super.create(), add the lines:
paddle = new FlxSprite(0, 0, "assets/images/paddle.png");
add(paddle);
Compile the game and you’ll see the paddle sitting in the top-left corner of the screen!
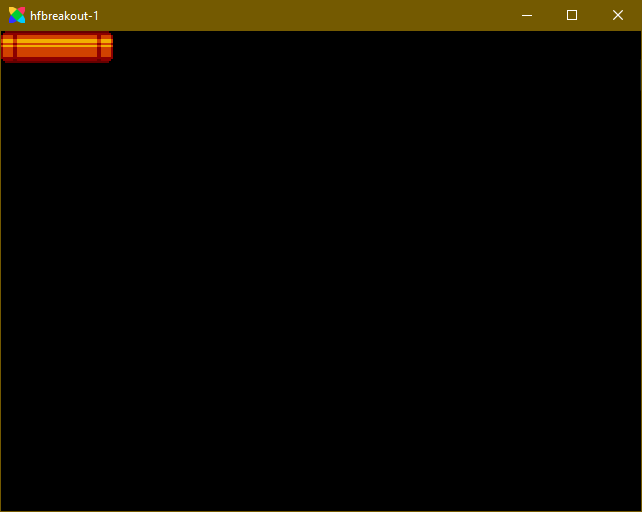
We created our FlxSprite at position 0,0. Since we use a simple static graphic, we can just pass it into the constructor. And that’s all you need to make a FlxSprite! However, we also have to add the sprite to the state. If you don’t add it, HaxeFlixel will basically act as if it doesn’t exist and it therefore won’t appear on screen. So don’t forget to add your sprites!
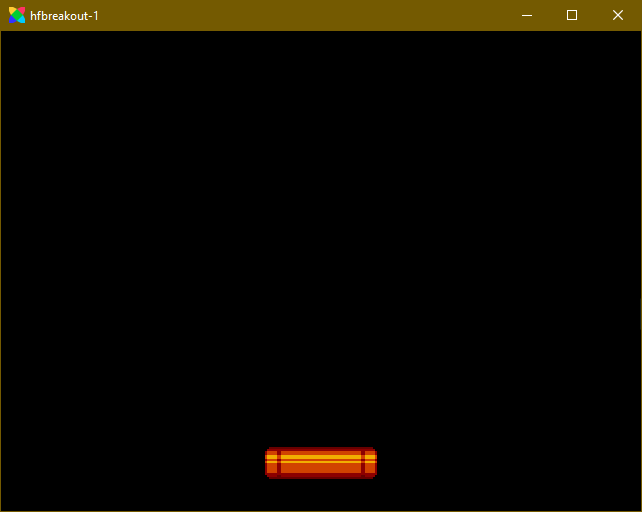
The paddle isn’t doing us a lot of good up there in the corner though, so let’s try putting it somewhere else. We could of course simply pass in different coordinates into the constructor, but there is another way to position a FlxSprite: The method setPosition…well, it sets the position of the sprite. This function takes two arguments: The desired x and y coordinates. So, after creating the paddle sprite, do this:
paddle.setPosition(FlxG.width / 2 - paddle.width / 2, FlxG.height - 64);
Note: You can add this line either before or after add(paddle). It doesn’t really make a difference in this case!
This will set the paddle’s x-position to FlxG.width / 2 - paddle.width / 2 and the y-position to FlxG.height - 64. But what’s FlxG and the other stuff?
FlxG is a very useful global helper class that handles general functionality. In our case we get the width and height properties, which contain the width and height of our game (as defined in the FlxGame constructor). So FlxG.width / 2 is the horizontal center of screen. We then shift the paddle’s position left by half its width, to properly center it. width is a property of FlxSprite, along with height.
By the way: In HaxeFlixel, the top edge of screen has the y-value 0, while the bottom one has FlxG.height (in our case 480).
Compile the game again and you should see that the paddle is now in position at the bottom of the screen!
That’s it for part 1. We’ve learned something about the anatomy of a HaxeFlixel project, met some basic classes and even put a paddle on screen. Not bad! Next up, we’ll add a ball and some walls. Be excellent to each other, and party on!
If you have any questions, comments or criticism, post them in the comments below or reach out to me on Twitter @ohsat_games!

Want To Buy Me a Coffee?
Coffee rules, and it keeps me going! I'll take beer too, though.
Check out the rest of this tutorial series!
Comments
By using the Disqus service you confirm that you have read and agreed to the privacy policy.
comments powered by Disqus