HF Breakout 2 - Balls and Walls


Welcome back to part 2 of the HaxeFlixel Breakout tutorial! This time we’ll add a ball and some walls to keep it in play, and we’ll even make the ball bounce. Let’s get into it!
Asset Paths
A brief excursion: We specified the path of the paddle graphic asset manually. But HaxeFlixel also offers us an easier option. Instead of specifying the path, we could have done:
paddle = new FlxSprite(0, 0, AssetPaths.paddle__png);
HaxeFlixel generates paths to all assets and stores them in AssetPaths. This way we don’t have to memorize and input the paths manually. This is good when you move assets around, as you won’t have to update all references to them. However, there are two things to note:
- As you can see, you need to separate the file extension with
__(two underscores) instead of a dot. - When you’ve just added new assets to the project, you might have to restart the Haxe language server so that HF puts it in
AssetPaths. In VSCode, simply pressCtrl + Shift + Pand selectHaxe: Restart Language Server. Then just wait a couple seconds and you’re ready to go!
Ballin'
We have the paddle—now we need a ball!
First, add a variable to the class to hold it:
var ball:FlxSprite = null;
Now to create the ball in create. But…I forgot to make a graphic! Oh well, lucky for me, HaxeFlixel can help us out:
ball = new FlxSprite(0, 0);
ball.makeGraphic(16, 16, FlxColor.RED);
add(ball);
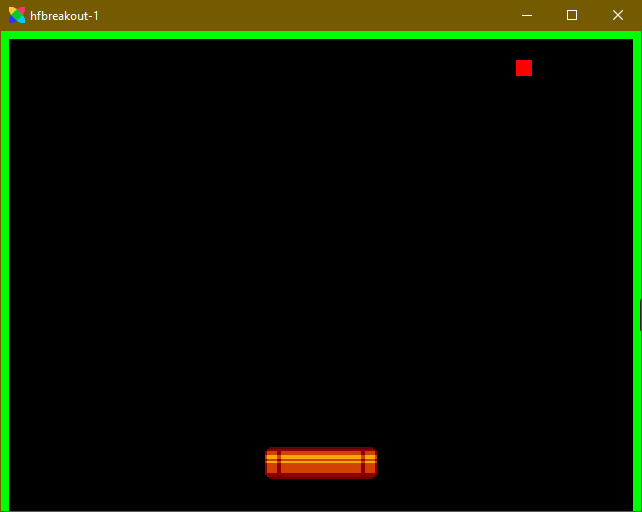
The function makeGraphic is a method of FlxSprite and allows us to quickly create rectangular sprites. In our case, the ball is 16x16 pixels big and it’s red; the class FlxColor contains a few preset colors we can use. Both makeGraphic and FlxColor are great for prototyping, as you can get things on screen very, very quickly.
Now we have a ball, but it’s stuck in the corner. Let’s center it on screen! We could calculate the position manually, using FlxG like we did before. Or we could simply do:
ball.screenCenter();
I probably don’t have to explain what this method does, the name is kind of a giveaway.
Now we have a paddle and a ball! This is starting to almost look like something. But things need to move in order for it to be a game. So, let’s make the ball bounce.
Bouncing
As I’ve said before, FlxSprite has many properties. One of them is velocity. Set it, and HaxeFlixel will move the object by its velocity each frame automatically. The speed of the object doesn’t deteriorate, so it doesn’t get slower with time. Let’s try it on the ball to see how it works. First, define a variable at the top of the state:
var BALL_SPEED:Float = 200;
Then in create, after creating the ball, add:
ball.velocity.set(BALL_SPEED, -BALL_SPEED);
Compile the game and the ball will fly to the top-left! So far so good. But this is Breakout, so the ball has to bounce off the edges of the screen to stay in play. So, now we have two jobs: Create walls surrounding the play area, and make the ball bounce off them. Logically, the first step is to create the walls.
Walls and Groups
We’ll create 3 walls: On the left, top, and right edge of the screen. We’ll also meet a new HaxeFlixel type that is very powerful. At the top of the state, define a new variable:
var grpWalls:FlxTypedGroup<FlxSprite> = null;
Here we define a new FlxTypedGroup, or a group for short. In HaxeFlixel, a group is basically a fancy array; it allows you to store a bunch of objects of the same type. In this case we set the type parameter to FlxSprite, so this group holds FlxSprites.
We could just use a regular array, but groups are an integral part of HaxeFlixel and make accomplishing things a lot easier, as we’ll soon see.
Anyway, time to build some walls. Add the following chunk of code in create.
// Add walls
grpWalls = new FlxTypedGroup<FlxSprite>();

var topWall = new FlxSprite(0, 0);
topWall.makeGraphic(FlxG.width, 8, FlxColor.LIME);
grpWalls.add(topWall);

var leftWall = new FlxSprite(0, 0);
leftWall.makeGraphic(8, FlxG.height, FlxColor.LIME);
grpWalls.add(leftWall);

var rightWall = new FlxSprite(FlxG.width - 8, 0);
rightWall.makeGraphic(8, FlxG.height, FlxColor.LIME);
grpWalls.add(rightWall);

add(grpWalls);
First, we actually create the group. It’s easy to forget this, but it’s important, as otherwise a null access error will hit us in the face!
Then we create our three walls. Again we use FlxG to position them on the edges of the screen and FlxColor to color them a nice lime green. Then we add each wall to the group using the add command. Finally, we add the group itself to the state. This will automatically add all members of the group to the state as well, so there’s no need to double dip. Compile the game and see our glorious walls standing there!
Next, we want to make the ball bounce off the walls. This requires one set of stepup step of setup. After adding all walls to the group, add this for-loop:
for (wall in grpWalls)
{
    wall.immovable = true;
}
Here, we iterate through the group (like we would with an array) and set the property immovable of each member to true. Every FlxSprite has this property, and it’s important for collision. If we didn’t set this, the walls would fly away when ball hits them! For more information, check out my post on collisions and overlapping in HaxeFlixel.
Now the walls are stable, so let’s smash our ball into them! For this we’ll use the collision functions built into HaxeFlixel. And while collision handling is usually a bit tricky, in our case, it’s very easy to do. In update, after the super.update call, add:
FlxG.collide(ball, grpWalls);
This function does the following: HaxeFlixel takes the ball and every wall in the group. It then checks if they overlap, one by one. If the ball does overlap a wall, they get separated.
This is one of the main reasons to use a group instead of an array. You can simply pass a group into collide and HF will automatically iterate through!
If you compile the game now, you’ll see that the ball now stops at the wall! And since you’re probably curious: Feel free to set wall.immovable = false for each wall and see what happens when the ball hits them. Don’t forget to change it back afterwards though!
Now the ball won’t phase through walls anymore, which is good. However, we want it to bounce, not just stop dead. We could do this manually by manipulating the velocity of the ball, or we could use a trick… of course we’ll go with that. In create, after creating the ball, add:
ball.elasticity = 1;
Yet another useful property of FlxSprite! The elasticity property represents how bouncy an object is. The default is 0, the maximum is 1. At 0, the object simply stops on collision, as we’ve seen. But at 1, the object bounces off without losing speed. Go ahead and try it out!
And with just this one line we have the ball bouncing off walls! Awesome.
Things have certainly gotten more dynamic now! But a Breakout game isn’t a Breakout game when you can’t break things. So, in the next part, we’ll add some bricks! Be excellent to each other, and party on!
If you have any questions, comments or criticism, post them in the comments below or reach out to me on Twitter @ohsat_games!

Want To Buy Me a Coffee?
Coffee rules, and it keeps me going! I'll take beer too, though.
Check out the rest of this tutorial series!
Comments
By using the Disqus service you confirm that you have read and agreed to the privacy policy.
comments powered by Disqus