Megarunner 2 - Tiles
NOTE:
This tutorial is most likely not compatible with versions of SGDK above 1.70.
Unfortunately, I simply do not have the capacity or ability to update them right now. Read more about it here. Sorry.


Welcome back! Now that we have a framework, we can start building the game proper. Let’s start by importing some graphics and displaying tiles on the screen, so that our game stops looking like a text adventure.
We’ll be using some graphics from the Game Creator’s Pack by Jonathan. You won’t have to download it, I’ll provide all the files you’ll need here, especially since I’ve edited some of them.
But first, let’s change the background color! Our game will take place during the day, so let’s make the background a nice sky blue. Of course you could create a solid blue tile and populate the background with it, but that would be a waste of data. There is a far easier option! Call the following function at the beginning of main(), after setting our joypad callback:
VDP_setPaletteColor(0,RGB24_TO_VDPCOLOR(0x6dc2ca));
If you compile the game now, the background should be blue, not black. But what exactly did we do and why did it work? First of all, this is the signature of VDP_setPaletteColor:
VDP_setPaletteColor(u16 index, u16 value)
As the name implies, this function manually sets the color value at a specific index in the Mega Drive’s palette. The MD can use a total of 64 colors split up across 4 palettes (PAL0 – PAL3), so valid indexes run from 0 – 63. As you can see we manually changed the very first color, which is saved at index 0 (and which would be part of PAL0). But why did this change our background color? Because by default, the color at index 0 is used for the background! That’s pretty much the whole secret. Oh and by using the helper function RGB24_TO_VDPCOLOR() we can simply use a hex value for our color, which is convenient.
Tiles
Alright, with the background properly colored, it’s time to add tiles! First we’ll need to import our resources so that we can display them. I’ve prepared a set of 3 images that you can download here:
Click here to download the zip file!
And for reference, this is what the files look like (don’t just right-click and save these, you’ll have to use the files in the archive, otherwise they won’t work!):

Alright, now create a folder called tiles within the res folder of your project, then move the images inside of it. Next, create a new file within the root of the res folder called resources.res. If you’re doing it in Windows Explorer, just create a new text file and change the name and extension (but you can also just do it from within VSCode). Then open it up and add the following three lines:
IMAGE floor "tiles/floor.bmp" 0
IMAGE wall "tiles/wall.bmp" 0
IMAGE light "tiles/light.bmp" 0
This will load and compile the resources so that we can use them. Before we put them on the screen however, we’ll need to do a bit of preparation work. First, include the new header file that SGDK will now generate at the top of main.c:
#include <resources.h>
Otherwise our program won’t know about the resources. Next, in main(), add the following line after the joypad code but before showText(msg_start);:
VDP_setPlanSize(32,32);
Alright so what’s going on here? We’re setting the size of the planes in tiles. Valid combinations are 32x32, 32x64, 64x64, or 32x128. Why are we doing this? Well, our game will use a very simple, looping background so we don’t really need more tiles than 32x32 and saving on resources is always a good idea. Plus, knowing the exact size of the planes will help us with scrolling them later.
Okay, now let’s load the tiles into the game. Put these lines after VDP_setPlanSize(32,32);:
VDP_loadTileSet(floor.tileset,1,DMA);
VDP_loadTileSet(wall.tileset,2,DMA);
VDP_loadTileSet(light.tileset,3,DMA);
Then we’ll need to grab the palette we want to use, otherwise things will just be in black and white and look terrible:
VDP_setPalette(PAL1, light.palette->data);
As you can see we’re using PAL1 and not PAL0. This is pretty much just for convenience, even though it’s a bit wasteful. Remember that we set the first color of PAL0 to turn the background blue? If we loaded our tile palette into PAL0, that blue would be overwritten again, which we don’t want. So from here on out we’ll just use PAL1 and upwards. Again, in a proper game with lots of fancy graphics you’d want to use all 64 colors the MD can handle. But in the case of our little game, we can afford to waste the remaining 15 colors in PAL0.
After that bit of theory we’re now ready to put stuff on screen so that we can liven up our static blue background a bit. First, we’re going to add the floor to the game:
VDP_fillTileMapRect(BG_B, TILE_ATTR_FULL(PAL1,0,FALSE,FALSE,1),0,16,32,1);
VDP_fillTileMapRect(BG_B, TILE_ATTR_FULL(PAL1,0,FALSE,TRUE,2),0,17,32,14);
The first line adds a row of floor tiles at tile-position (1:16) that covers the plane from left to right. The second line adds wall-tiles below it that fill out the bottom part of the screen. Remember to use TILE_ATTR_FULL to specify the palette we want to use.
If you compile the game now, you should see a nice floor in front of a nice blue sky. Nice! But let’s spice things up a little by adding some street lights. And let’s learn about a new SGDK function while we’re at it!
Splitting Tiles
So far we’ve only used functions that draw a single tile on the screen. But as you know, backgrounds are made up of a lot of different tiles that are arranged to create a larger image. For example, check out this temple structure from the original Sonic the Hedgehog that I took from Spriters Resource:
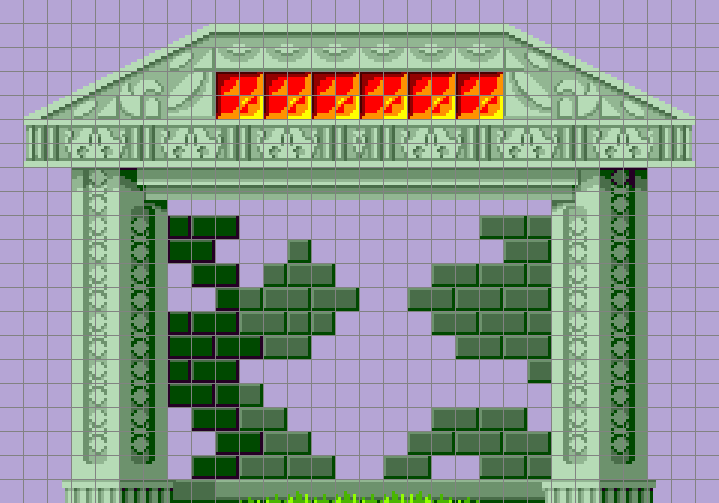
See how its made up of a pile of small 8x8 pixel tiles? It would be a nightmare to place each of these tiles individually. Luckily SGDK can help us out with a nifty function! But the Marble Zone temple would be overkill as an example, so let’s use the street light image (that we’ve already imported) instead. I have created it myself and I’m sure you’ll agree that it looks as amazing as anything in Sonic the Hedgehog. This image is made up of 6 tiles, as you can see here:

Now, remember that the Mega Drive can only handle tiles that are 8x8 pixels big. That’s why SGDK actually splits this image up into 6 separate tiles when we import it. This makes it very convenient for us, as we can just create a big multi-tile image and the SGDK resource compiler will split it up into 8x8 pixel chunks for us. But were are those chunks now?
We used the following line to import our light image:
VDP_loadTileSet(light.tileset,3,DMA);
When loading a tileset, we specify the index where the tile should be saved in VRAM. In this case we want the light to be saved in position 3. But the image has 6 tiles, not just one…so where are the other 5? The answer is simple: SGDK automatically slotted them into indexes 4-8! Feel free to confirm this by using VDP_setTileMapXY(BG_A,4,1,1). It should draw a chunk of our light at tile position (1:1).
That’s also the reason why we’ve imported light after floor and wall. That way we didn’t have to keep track of how many tiles are actually saved in VRAM (although obviously we’ll have to do that in bigger projects).
Okay, enough with the theory. How do we get those tiles on screen in an efficient manner? By using the following function:
void VDP_fillTileMapRectInc(VDPPlan plan, u16 basetile, u16 x, u16 y, u16 w, u16 h);
You can see that it’s sort of an expanded version of VDP_fillTileMapRect and even the parameters seem to be the same, so what exactly does this function do? Well, just like VDP_fillTileMapRect it does draw a rectangle of tiles on the screen, but there is one crucial difference. See how the second parameter is called basetile? That’s because we’re only specifying the first tile to be drawn, not the only tile. What this means is: VDP_fillTileMapRectInc calculates how many tiles it needs to draw, then increments the tile index by 1 for each tile.
Let’s just do it to make things a bit clearer. Add this after our two VDP_fillTileMapRect calls:
VDP_fillTileMapRectInc(BG_B,TILE_ATTR_FULL(PAL1,0,FALSE,FALSE,3),15,13,2,3);
You can see that we’re drawing a rectangle at position (15:13), with a width of 2 and a height of 3. 2x3 = 6, so this rectangle will consist of 6 tiles. We’ve given basetile as 3, which is the first tile of our light image. VDP_fillTileMapRectInc will now draw tile 3 at the specified position (15:13). Then it will draw tile 4 at position (16:13), to the right of the first tile. Then it will draw tile 5 at position (15:14) and so on, until the rectangle is fully drawn. Note that VDP_fillTileMapRectInc goes from left to right and top to bottom.
Wow, that was a lot to take in. But if you compile the game now, you should see a beautiful street light gracing the screen!
Alright, looking good so far! But we’re not done quite yet, as there is one final piece of info you’ll need. Some of you might have already noticed, but: We’re setting the plane size to 32x32 tiles. However, the screen can actually display 40 tiles horizontally. This means that we should have 8 empty tiles on the right, but we don’t. The floor goes all the way through. Why?
It’s a bit tricky to explain, but planes are actually “stitched together” in all directions, meaning they repeat infinitely, without any space between them. This means that in our case, those 8 empty tiles aren’t actually empty at all: The Mega Drive automatically uses the first (left-most) 8 tiles of the plane to fill them up. And since we just use the same tiles over and over, you don’t notice the seam. This might seem strange, and it kind of is, but it’s also very useful, as we can fill the screen with fewer tiles, and saving resources on retro hardware is always important.
Anyway, our game now has a background. Next time we’ll learn how to scroll it across the screen, so that it’ll look like our character is running. Stay tuned and stay excellent!
If you've got problems or questions, join the official SGDK Discord! It's full of people a lot smarter and skilled than me. Of course you're also welcome to just hang out and have fun!

Want To Buy Me a Coffee?
Coffee rules, and it keeps me going! I'll take beer too, though.
Check out the rest of this tutorial series!
Comments
By using the Disqus service you confirm that you have read and agreed to the privacy policy.
comments powered by Disqus