Megarunner 1 - The Framework
NOTE:
This tutorial is most likely not compatible with versions of SGDK above 1.70.
Unfortunately, I simply do not have the capacity or ability to update them right now. Read more about it here. Sorry.


Welcome to a new tutorial series on Mega Drive development! Here we’ll be creating a Mega Drive game from scratch using SGDK, the Sega Genesis Development Kit. And this is what we’ll be working on:
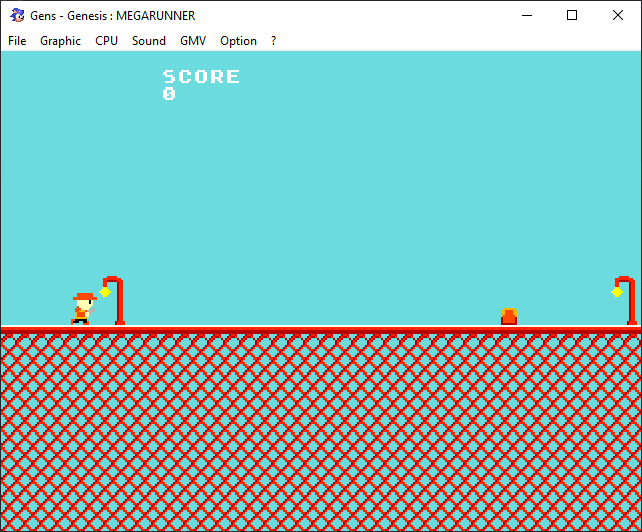
I call it Megarunner. It’s an endless runner-type game where you jump over obstacles to gain points. The game ends when you hit one of the obstacles. It’s a simple concept and thus a good way to learn about some new concepts of Mega Drive programming like scrolling and animation!
It is highly recommended that you check out the tutorial for Megapong first, as that tutorial leads you through setting up a development environment and teaches you the basics of Mega Drive programming. Concepts and ideas already explained in Megapong won’t be repeated in as much detail here, so it’s a good idea to learn the basics first.
And as a final note, this game will use assets created by Jonathan for his Game Creator’s Pack, so shoutouts to him!
And with all that out of the way, let’s get coding!
Setting up a project
First we’ll create a project and set up the general framework along with some functions that we’ll use throughout. This tutorial already expects you to have SGDK installed and a development environment up and running, so if you haven’t, work through the Megapong tutorial first! I feel like I’m saying that a lot.
Create a new project, either by cloning/downloading my template or by using your own that you might have created (with a .vscode folder already in it). Call it “megarunner”. Or whatever you want, really. Then open the project in your IDE (ideally VSCode).
Now let’s add stuff to main.c! First, at the very top, include the string header:
#include <string.h>
We’ll need it for some string manipulations later. Now below that we’re gonna add some variables. I’d recommend labelling this code block using a comment, so that you won’t end up with a pile of random variables at the end of the project.
/*General stuff*/
const char msg_start[22] = "Press START to Begin!";
const char msg_reset[22] = "Press START to Reset!";
bool game_on = FALSE;
The two message constants will store the strings we’ll display before and after the game. game_on will track whether the game is currently running or not. Note that C doesn’t actually have a bool type, but SGDK defines one for us to make things easier (with TRUE == 1 and FALSE == 0 respectively).
Next, let’s define two small helper functions. The first will display a line of text in the center of the screen, while the second will delete that line. We’ll use them to display (and delete) the strings we’ve just defined.
void showText(char s[]){
	VDP_drawText(s, 20 - strlen(s)/2 ,10);
}

void clearText(){
	VDP_clearText(0,10,32);
}
A quick reminder here that the text functions in SGDK use tiles as their unit of measurement, not pixels. So VDP_clearText(0,10,32) will delete a total of 32 characters (= tiles) in the 10th tile row from the very left of the screen.
Now we have an easy way to display and delete text without having to fiddle with the positioning every time. Next, we’ll define startGame() and endGame(), two functions that will handle the beginning and end of our game.
void startGame(){
	if(game_on == FALSE){
		game_on = TRUE;
		clearText();
	}
}

void endGame(){
	if(game_on == TRUE){
		showText(msg_reset);
		game_on = FALSE;
	}
}
As you can see, these functions toggle the game_on variable, while endGame() also displays our game over message using the function we just created. Told you it would be useful!
Alright, one more thing before we get to the main part of our game: We’ll have to create a callback function that will process our joypad input. We’ll only be using one joypad and two buttons, START and C. So add the following function:
void myJoyHandler( u16 joy, u16 changed, u16 state)
{
	if (joy == JOY_1)
	{
		/*Start game if START is pressed*/
		if (state & BUTTON_START)
		{
			if(game_on == FALSE){
				startGame();
			}
		}
		if (state & BUTTON_C)
		{

		}
	}
}
As you can see we’re already adding a bit of functionality: If the player presses start, startGame() is called, which makes sense if you think about it. We’ll find out what the C-button does later on.
Alright, now we’ll close things off with the main event in the form of main(). This of course is the function that will be called on start and contains all our actual game code. For now we’ll just define the basic stuff, so it’s not much to look at.
int main()
{
	//Input
	JOY_init();
	JOY_setEventHandler( &myJoyHandler );

	showText(msg_start);

	while(1)
	{
		if(game_on == TRUE){

		}
		SYS_doVBlankProcess();
	}

	return 0;
}
This is all pretty much boilerplate stuff. We initialize the joypad and tell SGDK to use myJoyHandler as our callback function. Then we display our msg_start message using that handy showText function again. Finally we begin the main game loop with while(1). We’ll have a section with things that should only happen when game_on is TRUE, but SYS_doVBlankProcess(); always needs to be called every frame.
Phew, that was quite a lot of code, but it’ll give us a good foundation to make our game. If you compile now you should see our string Press START to Begin! on screen and if you press Start on your controller it should go away. So far so good!
Stay tuned for the next installment where we’ll put some tiles on screen using a nifty new function. Thanks for reading and stay excellent!
If you've got problems or questions, join the official SGDK Discord! It's full of people a lot smarter and skilled than me. Of course you're also welcome to just hang out and have fun!
Learned Something?
Want To Say Thanks?
Feel free to buy me a coffee!
No Money?
Then join my Discord instead! It's a cool place with cool people.
Come hang out!Check out the rest of this tutorial series!
Comments
By using the Disqus service you confirm that you have read and agreed to the privacy policy.
comments powered by Disqus