Megapong 1 - Hello Mega Drive World!


Welcome to my new tutorial series on Mega Drive development! In it we will be creating a Mega Drive game from scratch using SGDK, the Sega Genesis Development Kit. This awesome piece of software allows you to program games for the Mega Drive in C instead of ASM, which makes things a whole lot easier. I will show you how to set up your development environment, how to import graphics, how to put things on the screen, how to control them and have them collide…
And this is what we will be making:
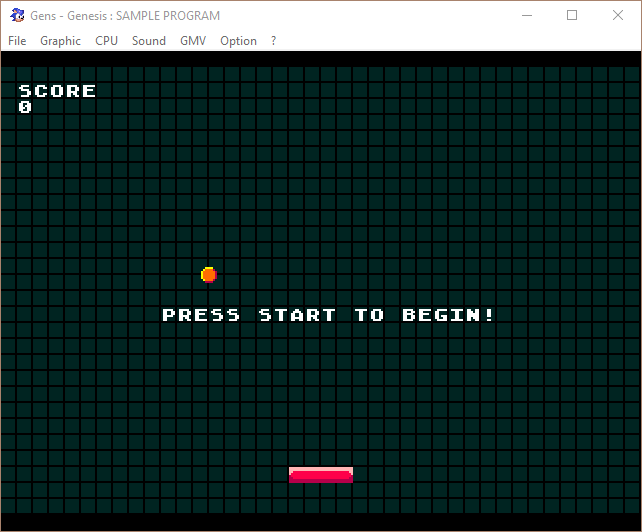
I call it Megapong. It is a very simple single-player Ponglike where the goal is to keep the ball in play for as long as possible. Each time you hit it you’ll receive points and when you’ve hit the ball a certain number of times, it’ll get faster. The game is over when the ball leaves the screen at the bottom. No it’s not gonna knock any blue hedgehogs off the shelf, but it’s a very good game to learn the basics of Mega Drive programming. And that’s the whole point!
This tutorial will lead you through every step of making this game, from setting up your environment to the collision code. While I will try to make everything as simple and accessible as possible, don’t forget that coding for retro platforms is tricky, and not the best entry point if you’ve never programmed a video game before!
But now, without further ado: Let’s get this show on the road!
Setting up SGDK
Before you set up SGDK itself, you need to install Java if you haven’t already. The latest versions of SGDK use Java to compile resources, which lets it do some pretty powerful and cool stuff.
Once you have Java installed, it’s time to install SGDK. You can download the latest version here. Please note that out of the box, SGDK only works on Windows. Linux users can give the Gendev Project a try, of which there also exists a Mac OS version here. Keep in mind that I have used neither of these and thus can’t really help with setting them up. The actual coding will work the same across all platforms, since all environments use SGDK, but the stuff around it (setting up folders, toolchains etc.) will most likely be different.
Once you’ve downloaded SGDK, unzip the archive anywhere you want. I put mine in C:\sgdk so that I have paths like C:\sgdk\bin.
Alright, now for the last step: Compiling the library. Open a command prompt and navigate into the folder where you installed SGDK (C:\sgdk for me). Then type in the following command:
.\bin\make -f makelib.gen
You should see a lot of text zipping by now. Once it’s done, check inside the lib folder of your SGDK folder. Do you see a file called libmd.a? Then congratulations, you have just succesfully installed SGDK!
Important: Adding to PATH
While this is enough to get SGDK up and running, there is one final thing we need to do, and that is to add the SGDK directory to the PATH. This site shows you how to access those settings on different versions of Windows. You’ll need to add a variable called GDK that points to your SGDK installation directory (like C:\sgdk, for example). It doesn’t matter whether you add it as a user or system variable, by the way! This step is not strictly necessary for SGDK itself, but it will be important for the development environment we’ll set up in part 2, as well as the Hello World project we’ll create in a minute!
Emulators
In order to test our games, we’ll need an emulator to load the roms we create. If you already have a favorite one, feel free to use it! Any reasonably up-to-date emulator should work. However, if you only want to use an emulator for Mega Drive development, you might want to use Gens KMod. It’s based on the famous Gens emulator codebase but adds a few debugging tools that are very useful for developers.
There is also BlastEm, which is a very accurate emulator. This is useful for developers, as when your game runs in BlastEm, it will almost certainly run on real hardware.
You can get either one or both, it’s your choice. Just download them and put them somewhere, it doesn’t matter where. Just remember where they are!
Setting up a project
A project in SGDK is basically just a folder with some stuff in it. The easiest way to set up a new one (for now) is to copy an empty template project. I’ve prepared one for you, so just download it below:
Click here to download the empty project file
Unzip it anywhere you want, then rename the extracted folder to helloworld. In the root of the folder you should now find the following folders:
out
res
src
This is the structure of a basic SGDK project. The out folder will contain our rom file once we have compiled one. res will hold the resources (graphics, audio…) for our project. The src folder contains our source code files. Inside you will find the main.c file, which is where we will add all of our code.
So let’s do just that!
Compiling and running Hello World
Now that we have finally set everything up, let’s see if we can actually get things running! We’ll do that by creating the old programmer standby, the Hello World program. Open up your project folder and open main.c (it’s within src, remember?) in your text editor of choice. You’ll see that there is already some code in there, but it doesn’t really do much. So, add the following line of code at the beginning of the main() function:
VDP_drawText("Hello Mega Drive World!", 8, 12);
For reference, your main.c file should now look like this:
#include <genesis.h>

int main()
{
    VDP_drawText("Hello Mega Drive World!", 8, 12);
    while(1)
    {
        SYS_doVBlankProcess();
    }
    return (0);
}
I’ll explain what these lines do in a second, but first let’s try to compile and run our program! Open up another command prompt and navigate to your project’s folder. Then type in the following command, replacing the path to the sgdk folder with your own path:
C:\sgdk\bin\make -f C:\sgdk\makefile.gen
So, for example, if you had SGDK installed in the folder D:\Stuff\sgdk, you would instead type:
D:\Stuff\sgdk\bin\make -f D:\Stuff\sgdk\makefile.gen
This will now compile your game! If you check in the out folder of your project, you should see a bunch of files, including one called rom.bin. That is your rom file! So load it up in your emulator and you should see the following:
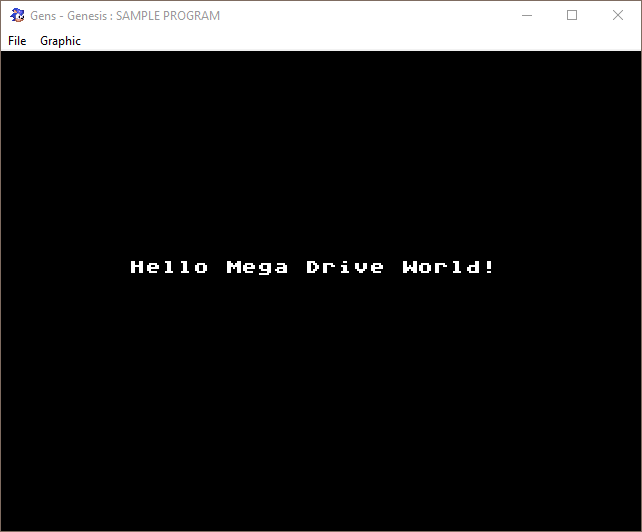
Success! You’ve made your first Mega Drive program. Give yourself a pat on the back! It may not look like much yet, but it is a big step on a brand new road. I mean, you just made a Mega Drive program. You wouldn’t have been able to do that yesterday!
But Wait, What Did I Just Write?
But now for a quick explanation of what you’ve actually typed. Most lines are simple boilerplate stuff that you’ll need for the program to even run. But two lines are of special interest for now. Let’s take a look:
VDP_drawText("Hello Mega Drive World!", 8, 12);
As you can probably tell, this function draws text on the screen. To be more precise, in this case, it draws the text “Hello Mega Drive World!” on the screen, at the coordinates (8,12). We’ll learn about coordinates later, but feel free to change these numbers around and see what happens!
By the way: This function uses the VDP of the Mega Drive, or the Video Display Processor, which explains the VDP_ prefix. Basically every function starting with VDP_ in SGDK does something visual, in this case drawing text on the screen.
The next interesting line also has something to do with visuals:
SYS_doVBlankProcess();
This is a very important function. Basically, everything you put into the while(1){ ... } loop is executed as quickly as possible, which might or might not sync up with your display. In order to avoid display issues, you have to tell your Mega Drive to wait until the screen display has been fully updated before it starts processing more stuff. And that’s what SYS_doVBlankProcess() does!
If that sounds confusing to you, don’t worry - you don’t really need to know the details for now. Just remember to always put SYS_doVBlankProcess(); at the end of your game loop and things should be fine. Also note: If you’re using an earlier version of SGDK (<1.6) you’ll have to use VDP_waitVSync(); instead!
Wrapping Up
That was a lot of stuff at once, but you’ve made it through and ended up with a working rom. Congratulations! Here’s what we will be taking a look at next:
- Setting up VSCode as a development environment
- Automating compilation/loading of roms
It might not sound exciting, but it will make everything a lot easier and more pleasant. And once you’ve set everything up you can use it for any future Mega Drive project you might try your hands on.
Thank you for reading! Until next time and be excellent to each other!
If you've got problems or questions, join the official SGDK Discord! It's full of people a lot smarter and skilled than me. Of course you're also welcome to just hang out and have fun!
Learned Something?
Want To Say Thanks?
Feel free to buy me a coffee!
No Money?
Then join my Discord instead! It's a cool place with cool people.
Come hang out!Check out the rest of this tutorial series!
Comments
By using the Disqus service you confirm that you have read and agreed to the privacy policy.
comments powered by Disqus