In this beginner tutorial you'll learn how to make Breakout game in HaxeFlixel from scratch!
HF Breakout 5 - Score!
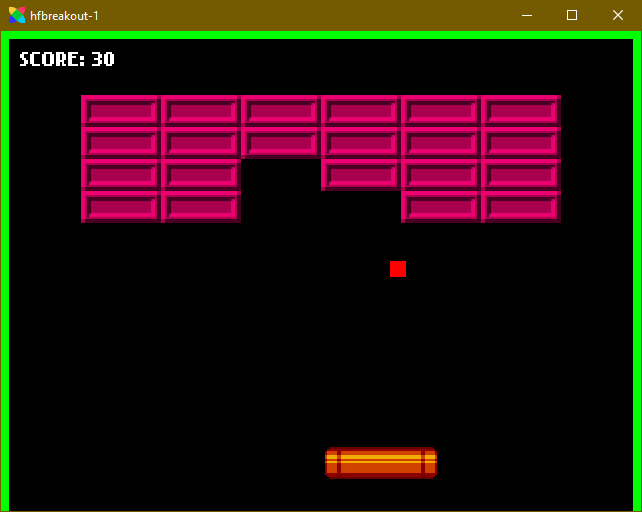
Numbers make the games go ‘round! Especially old arcade games like Breakout, where the score was the reason to play. So, let’s add a score counter to the screen!
Score
To keep track of the score, we’ll use a new type: FlxText. As the name implies, it’s a text that’s drawn on screen. We can change the color, font, formatting, effects, and so on. And since it extends FlxSprite, we can even use properties like velocity and elasticity to move it around! Very cool.
We won’t get fancy here though, we’ll just make a simple score label. To that end, define two new variables at the top of the state:
var score:Int = 0;
var scoreLabel:FlxText = null;
The integer score will store the actual score value, while scoreLabel will be used to render it to the screen. Let’s set this up! At the end of create(), create the text:
// Score
scoreLabel = new FlxText(16, 16, 0, "SCORE: 0", 16);
add(scoreLabel);
It’s pretty simple. The signature of the FlxText constructor is:
new(X:Float = 0, Y:Float = 0, FieldWidth:Float = 0, ?Text:String, Size:Int = 8)
The first two parameters set the position of the text. FieldWidth specifies the width of the text field, which comes into play with line breaks and such. Setting it to 0 makes it automatically fit the rendered text. Text is the text we want to render, and Size is the font size. Like any FlxSprite we have to add the text to the state so that it gets rendered.
The text now shows up on screen, but of course we need to update it occasionally. So we’ll write a function that updates the score text. It’s simple and short:
function updateScore(Value:Int)
{
    scoreLabel.text = "SCORE: " + Value;
}
As the name implies, the text property of a FlxText contains the text string we want to render. We pass in a string of SCORE: , along with the value that we pass into the function. Fun fact: Since Haxe 4, you can also do:
scoreLabel.text = 'SCORE: $Value';
Pick whatever style you prefer.
Now we need to increase the score. We want to give players points for each brick they break, so it makes sense to increase the score value in hitBrick():
function hitBrick(Ball:FlxSprite, Brick:FlxSprite)
{
    Brick.kill();
    score += 10;
    updateScore(score);
    //...
}
And that’s it for the score! Pretty quick and simple. Now play the game, break some bricks and see how the score is increased and updated!
In the final part of this series we’ll actually let players win—and lose!—the game. Be excellent to each other, and party on!
If you have any questions, comments or criticism, post them in the comments below or reach out to me on Twitter @ohsat_games!
Download the Project Files!
All patrons on Patreon get the complete source code for this tutorial, as well as other perks such as early access! And Patreon support also ensures that I can keep working on tutorials like this one. Become a Patron!Just Want to Buy Me a Coffee?
Check out the rest of this tutorial series!
Comments
By using the Disqus service you confirm that you have read and agreed to the privacy policy.
comments powered by Disqus