Using a Texture Atlas


Using a texture atlas (or a “sprite sheet”, if you prefer) is one of the easiest ways to increase the performance of your game. In case you don’t know what an atlas is: It’s essentially one big image that contains all your game’s sprites, along with a text file that lists all these sprites with their names and positions within the image, so that your game can easily retrieve them.
The reason a texture atlas increases the performance of your game is that instead of loading and storing hundreds of separate image files in memory, your game only needs to keep one image handy at all times. Even with a 90s platformer like Go! Go! PogoGirl, this can make a huge difference. I’d therefore highly recommend using a texture atlas once your game gets out of the prototyping stage.
Luckily, HaxeFlixel has a lot of built-in functions to help you out. However, it can be a bit confusing figuring out how it all works, so let me explain how I do it!
Note that there are probably better and smarter ways to do it, but this approach works for me.
Packing Textures
Broadly speaking, there are two big steps when using texture atlases: Preparing the texture atlas, and loading it in the game.
There are a bunch of different programs for creating a texture atlas, but I use Free Texture Packer. It’s free, flexible and gives me everything I need. Plus, it works well with HaxeFlixel.
I’m not gonna give you a full tutorial on how to use it, as it’s not that complex. But broadly speaking, this is what you want to do:
- Export all your sprites as single images. This means that every frame of every animation of every sprite should be its own image file (preferably .png). Make sure that files belonging to the same animation are numbered: For example,
pogogirl1.png,pogogirl2.png,pogogirl3.png… - Point your texture packer to the folder containing all your images. It will then pack them together into one big texture.
- Finally, export that big texture along with a descriptor file.
If you’re using Free Texture Packer, make sure to export the descriptor in xml format. The xml file contains a list of all your sprites (using the file names) along with their x- and y-positions within the texture. This file will serve as a “directory” for HaxeFlixel to look up what sprite has been stored where in the atlas texture.
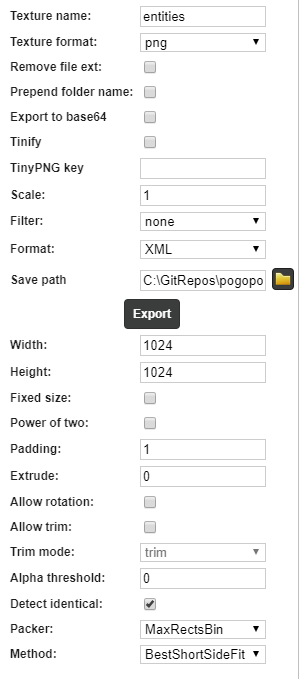
For reference, this is what my export settings look like in Free Texture Packer:
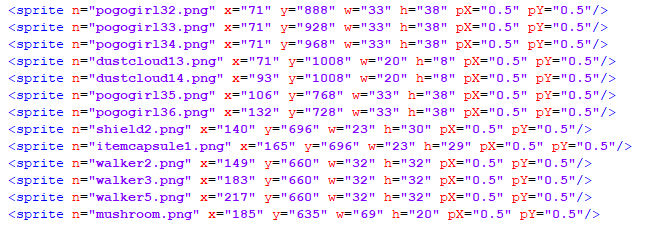
And this is a snippet from my exported .xml file. Note the numbered pogogirl entries, which are all animation frames of PogoGirl. Also note how they’re not in order, because Free Texture Packer sorts them as it sees fit (which is perfectly fine, as we won’t manually work with this list anyway):
Now plop the texture and xml file somewhere in the assets folder of your game.
Loading the Sheet
The next step is loading and using the atlas (or “sheet”) we’ve just created. This can be separated into two sub-steps: First, we load the atlas into memory. Then, each entity in the game grabs the frames it needs from the atlas.
To load the atlas, I use a singleton called SheetBox. You don’t have to do it that way, but I find it useful because a) it makes sure that the atlas is only loaded once and b) it actually makes it easier to load and deal with multiple atlases.
My singleton contains a private map _sheets of type Map<String, FlxAtlasFrames> which, as you can probably guess, stores all the loaded atlases, along with a name for easy retrieval. Actually loading an atlas is done like this in the constructor of the singleton:
_sheets["entities"] = FlxAtlasFrames.fromTexturePackerXml("assets/images/sheets/entities.png", "assets/images/sheets/entities.xml");
As you can see, we specify both the texture containing all our sprites (entities.png) and the corresponding descriptor file (entities.xml). HaxeFlixel then creates an object of type FlxAtlasFrames that combines the two to give us easy access.
Note: FlxAtlasFrames actually contains multiple functions to load atlases of different formats. For xml files exported in Free Texture Packer, fromTexturePackerXml is ideal. If you’re already used to another packer, feel free to check if FlxAtlasFrames has an import function for it!
Okay, now we have our atlas loaded and stored in the _sheets map. To retrieve the sheets from outside the singleton, I wrote a small helper function:
public function getSheet(Name:String):FlxAtlasFrames
{
	var s = _sheets[Name];
	if (s == null)
		throw "No Sheet by that name!";
	return s;
}
This one should be self-explanatory.
And again: You don’t need a singleton with a map of atlases. You could just as well just load your atlases at the beginning of the PlayState, or whatever. I just like the singleton approach because it keeps the codebase tidy, and I can easily reuse it in different projects.
Loading the Sprites
Okay, with the atlas now loaded and ready, it’s time to actually grab the sprites we need for our entities.
All my in-game entities (which extend from FlxSprite) have a helper function to easily load stuff from an atlas. It looks like this:
public function loadGraphicFromSheet(SheetName:String, ?Single:String)
{
	this.frames = SheetBox.instance.getSheet(SheetName);
	if (Single != null)
	{
		this.frame = this.frames.getByName(Single + ".png");
		resetSizeFromFrame();
	}
}
This function is used instead of the usual loadGraphic you use when loading a single image file.
The magic happens in the first line. As you can see, we’re setting the frames property to use the FlxAtlasFrames we just loaded in our singleton. This tells this sprite to use the atlas SheetName. And if our sprite doesn’t have animations, we’re almost done! That’s where the Single parameter comes in.
By setting this.frames, we tell the entity to use the atlas…but not which of the many sprites in the atlas to use. To do that, we need to set the frame property (don’t confuse it with frames) of the entity. This happens in this.frame = this.frames.getByName(Single + ".png"). The function getByName grabs the frame/sprite of a certain name from the atlas and sets it as the currently active frame of the entity. The name here is one of the names listed in the xml file of our atlas.
So, for example, if my atlas entities had a static image of a wooden crate in it that’s listed in the xml as crate.png, I’d call the function from inside my Crate entity like this:
loadGraphicFromSheet("entities","crate");
This will grab the crate sprite from the atlas and load it for the entity.
And you might have noticed the final line in that function: If we don’t call resetSizeFromFrame() after grabbing frames from an atlas, the hitbox of the sprite will actually be as big as the whole atlas texture itself! As the name implies, resetSizeFromFrame resizes the hitbox to fit the current frame, which is what we want.
Animations
That’s it for loading static sprites, but what if we want to load animations from the atlas? Luckily, this is only slightly different from how we usually load animations in HaxeFlixel.
First, when we call loadGraphicFromSheet from within our entity, we don’t pass in a Single argument, as we don’t just want to load a single sprite. Instead, we want to load animations. And we do that similarly to how we usually do it. Here’s an example:
animation.addByIndices("bounce", "pogogirl", [2, 2, 3, 3, 4, 4, 5], ".png", 15, false);
Instead of just calling animation.add, we call animation.addByIndices. And as you can see, the function signatures of both functions are similar. But let’s go through the parameters.
First, we specify the name our animation should have ("bounce"). Then we specify the base name of the sprite we want to load from the atlas; again, this is the name as listed in the xml file. Then, we specify the frames of the animation. Then comes a postfix (in most cases the file extension of the texture), along with the desired frame rate and whether the animation should loop.
So basically, it’s the same setup as with the usual animation.add, just that we also have to specify the name of the sprite and the file extension.
But there is a gotcha: When specifying animation frames with animation.add, the first frame of an animation is stored at position 0. However, this might not necessarily be the case with addByIndices! This function doesn’t directly load frames from anywhere. Instead, it combines the base name (pogogirl) with the frame numbers in the array and the postfix to load the frames from the atlas. This means that if the first animation frame is listed as pogogirl-1.png in the atlas, you have to pass 1 into the array to get it! And this also means that if your sprites in the xml aren’t listed with their file extensions, you can just leave the postfix argument empty in the function call.
And after loading the animation, don’t forget to call resetSizeFromFrame() to adjust the size of the hitbox. You might also have to call centerOrigin() if you want to do rotations, by the way!
Summary
This was a lot, so let’s go over it one more time. To load a sprite from a texture atlas in HaxeFlixel, you do the following:
- Export all your sprites and animation frames in single images. Make sure that files belonging to the same animation are numbered consecutively.
- Load the images into Free Texture Packer and export a texture with an
xmlfile. Thisxmlwill list all your image files using their file names, along with their position within the texture. - Load those two files into HaxeFlixel using
FlxAtlasFrames.fromTexturePackerXml(or a similar function, if you’re using different formats). This gives you aFlxAtlasFramesobject with all the data you need. - When you want to load sprites from the sheet, set the
framesproperty of the respective entity to the loadedFlxAtlasFrames. This basically tells the entity what atlas to use. - Load the frame(s) from the atlas you actually want to use, either by manually setting the
frameproperty or by loading animations. - Don’t forget to adjust the size of the hitbox, otherwise your entity will be as big as the whole atlas texture.
This might seem like a lot of work, but it can drastically improve your game’s performance, and once you’ve set it all up, it’s rather easy to reuse across your different projects.
Got a better way of handling texture atlases? Got any recommendations for texture packers? Let me know in the comments below!
If you have any questions, comments or criticism, post them in the comments below or reach out to me on Twitter @ohsat_games!

Want To Buy Me a Coffee?
Coffee rules, and it keeps me going! I'll take beer too, though.
Check out the rest of this tutorial series!
Comments
By using the Disqus service you confirm that you have read and agreed to the privacy policy.
comments powered by Disqus