Using Finite State Machines in HaxeFlixel

Let’s face it: Game code is a mess. There are just so many moving parts, so many things that interact, so much stuff to process that your code eventually starts resembling a plate of spaghetti that’s been hit by a tornado. However, there are patterns and techniques one can use to at least alleviate some of these problems. And one of the most powerful tools in the gamedev’s arsenal against chaos theory are states.
Luckily, HaxeFlixel comes equipped with full support for game states. So, you can create a MenuState and a PlayState, fill each with unique code and then simply switch back and forth between them. This way, your menu code won’t interfere with the gameplay code and vice-versa. That alone is a huge help (which is why I wrote a tutorial on how to create a simple state system for the Mega Drive).
However, states can also be very useful on a micro level. Take a platformer for example. Your character can move left, move right, and jump while he’s on the ground. In the air, jumping is disabled. That’s easy enough to achieve, just do if(onGround && pressedJump) jump(). But now imagine your character can also duck and crawl, which slows down movement and prevents jumping. And then there are ladders to climb that disable left/right movement. Also there’s swimming, which changes the entire moveset. Oh, and all these actions have their own animations that need to be managed. If we were to keep track of all this with simple variables, we’d have long and confusing strings of if-statements. And that’s were finite state machines come in.
The term “finite state machine” (or FSM for short) sounds fancy, and indeed there are some complex explanations on what it is. But in simple terms: It’s a system that lets us split up an object’s behavior across states, then switch between those states at will. So, in our platformer example, we’d have a Walking state, a Jumping state, a Ladder state… each state defines its own behavior, meaning there’s no conflict between the states. Only one state is active at a time, so it’s always clear what the player can do. It’s a very powerful way to structure complex behavior.
And here’s some good news: HaxeFlixel comes with its own state machine system! So, let’s take a look at how to use it, yeah?
Setting up the FSM
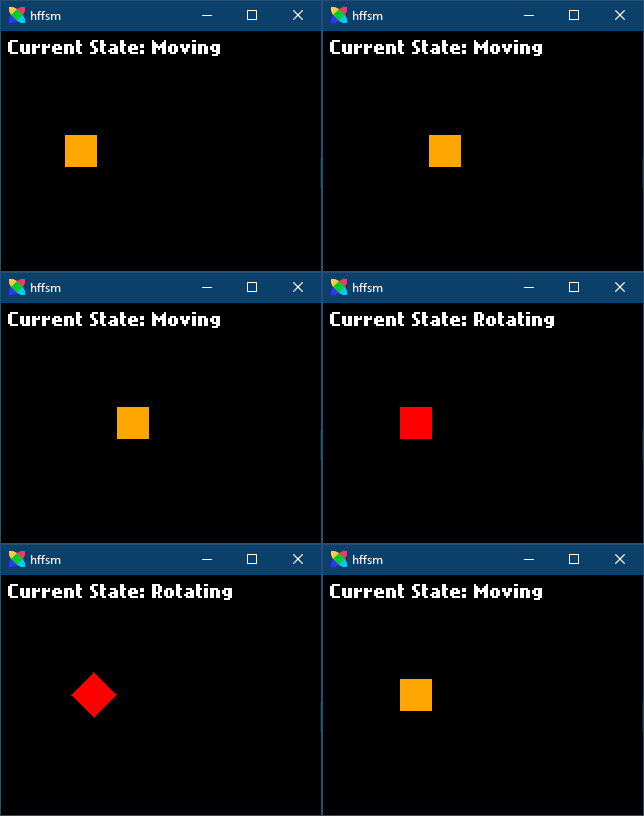
We’re going to create a small example that looks like this:

As you can see, we’re controlling a square. This square has two states: moving and rotating. Pressing left/right in the moving state will move the square, pressing the buttons during the rotating state will rotate the square. We can enter the rotating state by pressing Space, and exit it by releasing Space. Imagine you have a top-down shooter where you can enter an aiming mode by holding down a button and you’ll get the idea.
The very first thing we need to do is to enable the Flixel Addons, as the FSM code is part of that. Open up Project.xml in your project, scroll down and uncomment the relevant line so that it looks like this:
<!--In case you want to use the addons package-->
<haxelib name="flixel-addons" />
You might have to close and reopen your project for this to take effect. Now we have access to the FSM stuff!
Now we’re going to create a Player class that will use a FSM to control its movement. So, create a new file called Player.hx and define the class:
class Player extends FlxSprite
{
	public var fsm:FlxFSM<FlxSprite>;

	public function new(X:Float = 0, Y:Float = 0)
	{
		super(X, Y);
		makeGraphic(32, 32, FlxColor.WHITE);
	}
}
As you can see, the class itself is pretty simple. We have one property that will store the state machine and a simple constructor that will draw our player as a white square. And as you can also see, the fsm property is of type FlxFSM and comes with the type parameter <FlxSprite>. The type parameter has to match the object holding the state machine!
“But why aren’t we using Player as the parameter then?”, you may ask. That’s a valid question, and indeed we could have done public var fsm:FlxFSM<Player>. However, the HaxeFlixel FSM system is built in a way so that it can be easily reused, and using FlxSprite as the type parameter allows us to reuse parts of the system for all FlxSprites, not just Player objects.
Okay, now we have a player. But before we set up the FSM, another bit of theory!
States and Conditions
A finite state machine is made up of two major components: States and conditions. As mentioned, states hold the behavior of our object. Conditions define the transitions between the states; in other words, they tell HaxeFlixel when to switch from one state to the next.
Let’s take it step by step and create the actual states first. Each state will be its own class that extends FlxFSMState. You can define these classes in their own files, but we’ll just add them to Player.hx for now. Just make sure that you don’t define them within the Player class, but after it!
First, let’s look at the Moving class:
class Moving extends FlxFSMState<FlxSprite>
{
	override function enter(owner:FlxSprite, fsm:FlxFSM<FlxSprite>)
	{
		super.enter(owner, fsm);
	}

	override function update(elapsed:Float, owner:FlxSprite, fsm:FlxFSM<FlxSprite>)
	{
		super.update(elapsed, owner, fsm);
	}

	override function exit(owner:FlxSprite)
	{
		super.exit(owner);
	}
}
As you can see, each state has three major functions: enter, update and exit. These will be automatically called whenever a state is entered, updated, or exited, respectively. The argument owner is passed into each one, and it contains the object owning the state machine; in our case, the Player object. Defining the states as classes and passing the owner into it allows us to easily reuse states for a variety of objects that share the same behavior.
Now, let’s add some behavior. For example, let’s turn the player square orange when the Moving state is activated. We’ll add this to enter, as it only needs to be done once, when the state is first entered:
override function enter(owner:FlxSprite, fsm:FlxFSM<FlxSprite>)
{
    super.enter(owner, fsm);
    owner.color = FlxColor.ORANGE;
}
Next, let’s take care of the movement. As I’ve explained at the beginning, we can move the player square left or right. So, let’s add the required code to the update function of the state:
override function update(elapsed:Float, owner:FlxSprite, fsm:FlxFSM<FlxSprite>)
{
    super.update(elapsed, owner, fsm);

    if (FlxG.keys.pressed.LEFT)
    {
        owner.velocity.x = -60;
    }
    else if (FlxG.keys.pressed.RIGHT)
    {
        owner.velocity.x = 60;
    }
    else
    {
        owner.velocity.x = 0;
    }
}
If left or right is pressed on the keyboard, the player will move in that direction; otherwise, it’ll just stop. Finally, let’s define exit to make sure that the player stops moving before the next state is entered:
override function exit(owner:FlxSprite)
{
    super.exit(owner);
    owner.velocity.x = 0;
}
And that’s our Moving state done!
Let’s move on to the Rotating state. This one will look very similar, but instead of moving the player square, keyboard input will rotate it. Here’s the whole state at a glance:
class Rotating extends FlxFSMState<FlxSprite>
{
	override function enter(owner:FlxSprite, fsm:FlxFSM<FlxSprite>)
	{
		super.enter(owner, fsm);
		owner.color = FlxColor.RED;
	}

	override function update(elapsed:Float, owner:FlxSprite, fsm:FlxFSM<FlxSprite>)
	{
		super.update(elapsed, owner, fsm);

		if (FlxG.keys.pressed.LEFT)
		{
			owner.angle -= 2;
		}
		else if (FlxG.keys.pressed.RIGHT)
		{
			owner.angle += 2;
		}
	}

	override function exit(owner:FlxSprite)
	{
		super.exit(owner);
		owner.angle = 0;
	}
}
You can see that we turn the player square red when entering the state; rotate it during the update call; and reset the rotation when the state is exited. Simple stuff!
And with that, we have our states. However, we’ll also need to define the conditions that determine when each state is activated. These will also be defined in their own class to make them easily reusable. Add this class to Player.hx (although you could of course also create a dedicated file for it):
class Conditions
{
	public static function pressedSpace(Owner:FlxSprite):Bool
	{
		return FlxG.keys.justPressed.SPACE;
	}

	public static function releasedSpace(Owner:FlxSprite):Bool
	{
		return FlxG.keys.justReleased.SPACE;
	}
}
We only have two conditions here, and they are pretty simple; we simply check whether the Spacebar has been pressed or released. The logic inside conditions can be a lot more complex; for example, you could check whether the object has entered water, has lost a certain amount of health…whatever you need, really, as long as each condition is a function that returns a Bool. Also, note that these conditions are independent of the states we’ve created!
Connecting It All
Alright, we’ve got our states and our conditions ready to go! Time to wire it all up. In the constructor of our Player, create a new state machine after the call to makeGraphic:
fsm = new FlxFSM<FlxSprite>(this);
Note that we have to pass in the owner of the state machine! That’s the parameter that will be passed around to all the state and condition functions as owner.
Now we need to connect the states and the conditions. This looks like this:
fsm.transitions.add(Moving, Rotating, Conditions.pressedSpace)
    .add(Rotating, Moving, Conditions.releasedSpace)
    .start(Moving);
The transitions property contains the different transitions of the state machine. We can add a new one by using add, and have to specify the current state, the new state, and the condition that will trigger the switch. We have two transitions: From Moving to Rotating, and from Rotating to Moving. We also tell the fsm to start with the Moving state, meaning it will be the active state when the game starts.
You can link states together whichever way you want, and when things get very complex, it usually helps to jot down a little flow diagram of all the different states and conditions. Also note that you should only add transitions that you need! Sonic can’t do a spindash while in the air, so a transition like Jumping, Spindash, Conditions.startedSpindash would make no sense. Planning out the transitions gives you a lot of power over how your code is structured.
But enough talk, let’s see it in action! First, add one last thing to the Player class. We have to explicitly tell HaxeFlixel to update the state machine, so that all the transitions work. Do this by adding one line to the update function in the Player class:
override function update(elapsed:Float)
{
    fsm.update(elapsed);
    super.update(elapsed);
}
And that’s it! HaxeFlixel will now actively check all the defined conditions, initiate transitions (if applicable) and update the currently active state.
Let’s head on over to PlayState and see it all in action! First, create two new properties:
public var player:Player;
public var stateInfo:FlxText;
Then, in create, instantiate the player and add a new text object that will display the currently active state:
super.create();

player = new Player(64, 104);
add(player);

stateInfo = new FlxText(4, 4, 0, "", 16);
add(stateInfo);
Since all the behavior of player is defined in the Player class, that’s already enough. But let’s add one last line to the update function of the PlayState:
stateInfo.text = 'Current State: ${Type.getClassName(player.fsm.stateClass)}';
This will feed stateInfo the name of the currently active player state.
Finally, compile the game and try it out!
Everything should work as planned: Pressing right or left will move the player in that direction while in the Moving state. Pressing Space will transition to Rotating, turning the player square red and allowing us to rotate it with the cursor keys. Once we release Space, the rotation is reset and we return to the Moving state. Excellent!
Naturally this is a very simple example, but it shows how powerful state machines can be. They are also very versatile: They’re not just useful to structure complex player movement, they’re also indispensable when coding AI. For example, enemies could have a Patrol state where they walk back and forth, an Attack state where they somehow attack the player when he’s in range, and a Defeated state that disables their collision and makes them fall off the screen once they’ve lost all their hitpoints. That’s how I coded the bosses in Go! Go! PogoGirl, for example. And you could also use it for menus and other things! State machines are awesome, and mastering them is a surefire way to level up one’s programming skills.
Thanks for reading, and be excellent to each other!
If you have any questions, comments or criticism, post them in the comments below or reach out to me on Twitter @ohsat_games!

Want To Buy Me a Coffee?
Coffee rules, and it keeps me going! I'll take beer too, though.

Check out the rest of this tutorial series!
Comments
By using the Disqus service you confirm that you have read and agreed to the privacy policy.
comments powered by Disqus