Megalaga BONUS - Powerup
NOTE:
This tutorial is most likely not compatible with versions of SGDK above 1.70.
Unfortunately, I simply do not have the capacity or ability to update them right now. Read more about it here. Sorry.


One of the coolest things in shmups are the powerups. It’s fun to grab them to see what effects you get, and they can make you feel extremely powerful. So let’s put one in!
In part 8 we put a restriction on the amount of shots players can fire at once. This made the game more balanced, but–let’s be honest here–a bit less fun. So temporarily lifting that restriction sounds like a good idea for a powerup to me!
Variables
Let’s define a few things. First of all, we’ll need a new variable that keeps track of how many bullets players can currently shoot. This is the one we’ll be changing when the powerup is active to raise the limit. So add this line below the MAX_PLAYER_BULLETS define:
u16 maxPlayerBullets = MAX_PLAYER_BULLETS;
Next we’ll need some things for our powerup:
#define POWERUP_DURATION 180
u16 powerupTimer = 0;
Entity powerup = { 0,0,8,8,0,0,0, NULL };
The first two will help to keep the powerup active for a limited time only (3 seconds in our case, but feel free to adjust it). And Entity powerup will be the actual powerup that we spawn. I’m only doing one for the purposes of this tutorial, but of course you can extend this if you want to have multiple powerups on the screen at once.
And finally, let’s make our code a bit more flexible for the future with an enum that differentiates between various powerup types. Even though we’ll only have one type here, this will make it a bit easier to add others.
typedef enum
{
    RapidFire
} Powerup;
Functions
Alright, let’s get cracking. First, hop on over to shootBullet(). Replace the line if(shotByPlayer >= MAX_PLAYER_BULLETS) near the beginning with the following line that uses our new variable:
if(shotByPlayer >= maxPlayerBullets){
    //...
}
Now we can set the maximum amount of player bullets on the fly. Next, we’ll need to define a total of four functions to help us deal with our powerup. We’ll fill the bodies out as we go, but go ahead and define all of them now:
void spawnPowerupAt(u16 X, u16 Y){}
void positionPowerup(){}
void activatePowerup(Powerup Type){}
void deactivatePowerup(){}
Looks like we got our work cut out for us!
Let’s start with activatePowerup. As you can see we’re passing in the type of powerup that we want to activate. We will then use a switch statement to decide which effect we want to activate. Again, we’re only dealing with one type of powerup in this tutorial, but by setting up the code this way we can easily add more later on.
void activatePowerup(Powerup Type){
    switch(Type){
        case RapidFire:{

        }
        default: return;
    }
}
Okay, so the powerup is supposed to increase the number of bullets players can fire. How could we achieve this? By setting maxPlayerBullets = MAX_BULLETS;! This will allow players to use the entire bullet pool. However, we want to limit the use, so we will also have to set up our powerupTimer. So now our function looks like this:
void activatePowerup(Powerup Type){
    switch(Type){
        case RapidFire:{
            maxPlayerBullets = MAX_BULLETS;
            powerupTimer = POWERUP_DURATION;
        }
        default: return;
    }
}
That would work as it is, but let’s be fancy and change the color of the player ship while the powerup is active. So add the following line as well:
VDP_setPaletteColor(18, RGB24_TO_VDPCOLOR(0xf8fc00));
The index 18 points to the orange color of our ship in PAL1. We did something similar in part 3 and I also have a separate tutorial on swapping colors if you want a bit more detail.
Let’s finish up the counterpart function deactivatePowerup as well while we’re at it. This function will simply revert the changes we just made:
void deactivatePowerup(){
    maxPlayerBullets = MAX_PLAYER_BULLETS;
    VDP_setPaletteColor(18, RGB24_TO_VDPCOLOR(0xf83800));
}
So far so good. You’re probably itching to try things out, so let’s do that with a little debug trick! Head on over to myJoyHandler and add a new if-statement to the end:
if (state & BUTTON_A & changed)
{
    activatePowerup(RapidFire);
}
We’re not using the A button for gameplay, so we can use it for debug purposes. Don’t forget to delete this line before releasing your game though!
Alright, we got a yellow ship that’s shooting like there’s no tomorrow! Works great. Unfortunately now we’ll have to limit the fun a bit. Again.
Go to the main game loop in main(). We’ll now add code to limit the duration of the powerup. It’s rather simple, so add this chunk before SPR_update():
if(powerupTimer > 0){
    powerupTimer--;
    if(powerupTimer == 0){
        deactivatePowerup();
    }
}
You’ll recall that we’re setting powerupTimer to POWERUP_DURATION when we’re activating a powerup, so as long as powerupTimer is bigger than 0, we can assume that a powerup is active. So each frame we will decrease the timer until it hits 0: That’s when we deactivate the powerup. And since powerupTimer > 0 is now false, the timer won’t keep ticking down. Which is good, because it’s a u16 and therefore couldn’t go lower anyway.
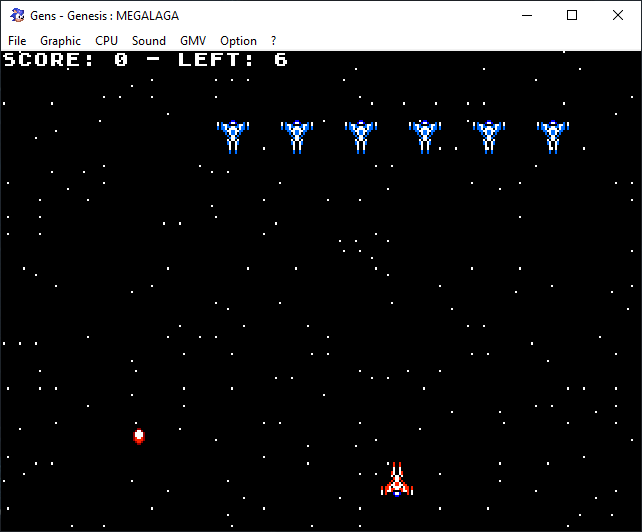
Adding The Item
So we have the functionality, but now let’s add the powerup proper. First, grab the sprite we’ll be using:
And then import it like so:
SPRITE spr_powerup "sprites/powerup.bmp" 1 1 FAST 0
Now go to main and create the powerup sprite after you’ve created all the bullet sprites:
/*Create the powerup*/
powerup.sprite = SPR_addSprite(&spr_powerup, powerup.x, powerup.y, TILE_ATTR(PAL1, 0, FALSE, FALSE));
killEntity(&powerup);
Note that we’re killing the powerup entity immediately. This is because we don’t want it to show up from the start, we want to spawn it later. Also note that killEntity expects a pointer, so we have to pass in the address of our entity.
We have a powerup entity on standby now, so let’s get to spawning it by returning to one of our 4 functions. It’s pretty simple:
void spawnPowerupAt(u16 X, u16 Y){
    powerup.x = X;
    powerup.y = Y;
    reviveEntity(&powerup);
}
As you can see we’re passing in the coordinates where we want it to spawn. Since we already have a powerup created we can simply revive it. If you had multiple powerups you’d be taking one out of the pool here.
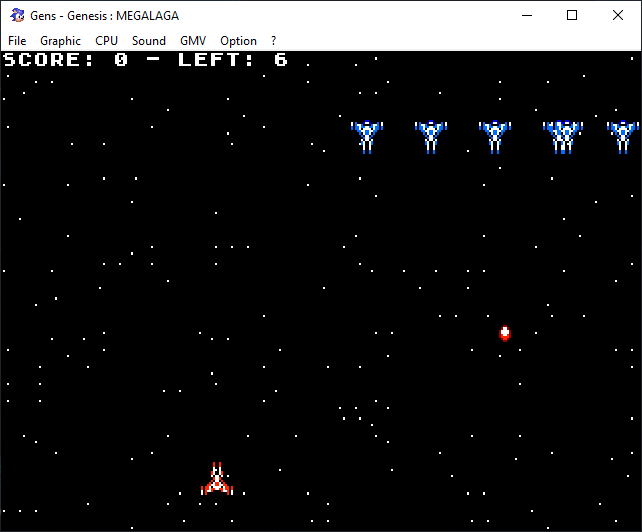
And while we’re fiddling with our functions again, let’s finish up the last one as well. Our powerup sprite needs to be positioned on screen and we want it to move downwards so that players can collect it. But we also don’t want it to loop around, so we have to kill it once it leaves the bottom edge of the screen. This is what that looks like in code:
void positionPowerup(){
    if(powerup.health > 0){
        powerup.y++;

        if(powerup.y > BOTTOM_EDGE){
            killEntity(&powerup);
        }
    }

    SPR_setPosition(powerup.sprite,powerup.x,powerup.y);
}
We’re almost done! But before we spawn it, let’s implement the collision with our player so that the powerup item actually has an effect. Instead of creating a new function for it, we’ll simply stick the code in our current one. So the whole function now looks like this:
void positionPowerup(){
    if(powerup.health > 0){
        powerup.y++;

        if(powerup.y > BOTTOM_EDGE){
            killEntity(&powerup);
        }

        if(collideEntities(&player,&powerup)){
            activatePowerup(RapidFire);
            killEntity(&powerup);
        }
    }

    SPR_setPosition(powerup.sprite,powerup.x,powerup.y);
}
And before we forget, add a call to positionPowerup() inside of your main game loop! I put mine right after the calls to all the other positioning functions.
We are so close! We now have the functionality and the actual item implemented, so all that’s left is to actually spawn a powerup. We will be doing this inside of our handleCollisions() function, more specifically after a collision between a bullet and an enemy. Add this right before the break; at the end:
if (enemiesLeft % 5 == 0)
{
	spawnPowerupAt(e->x, e->y);
}
We’re using the modulo operator % here to spawn a powerup whenever enemiesLeft is cleanly divisible by 5. You can of course add a random element to it or use more specific criteria; I’m just keeping it simple here.
And that’s all we need! Compile the game and try it out. Once you’ve shot the 5th-to-last enemy a powerup should pop up, float downwards and give you rapid fire if you manage to collect it!
And that wraps up the Megalaga tutorial. Thank you for reading, thank you very much for the support and be excellent to each other!
If you've got problems or questions, join the official SGDK Discord! It's full of people a lot smarter and skilled than me. Of course you're also welcome to just hang out and have fun!

Want To Buy Me a Coffee?
Coffee rules, and it keeps me going! I'll take beer too, though.
Check out the rest of this tutorial series!
Comments
By using the Disqus service you confirm that you have read and agreed to the privacy policy.
comments powered by Disqus