Make a Text Crawl, Streets of Rage Style
NOTE:
This tutorial is most likely not compatible with versions of SGDK above 1.70.
Unfortunately, I simply do not have the capacity or ability to update them right now. Read more about it here. Sorry.


The Streets of Rage opening is one of the most iconic in gaming. Let’s make our own!
Streets of Rage is not only one of the best beat ‘em ups, but one of the best games ever. Everything about it is classic, from the characters, to the gameplay, to—of course—the music. And one of the most memorable things about the game for me is the game’s opening. That amazing shot of the city, the incredible music that sets a somber, yet groovy tone, and the story slowly crawling up the screen, preparing you for what’s to come.
Granted, I didn’t understand the story as a kid, but it was still impressive.
Programming an intro like this is actually pretty easy. So, let’s make one of our own!
Graphics
First, some theory. In SGDK, text is treated the same way as graphics are. What I mean by that is that every character that you render on screen is actually nothing more than an 8x8 tile on one of the two planes BG_A or BG_B. This means that we can achieve scrolling text the same way we can achieve scrolling graphics in general! So, in order to get our SOR-like opening, we’ll have a plane with the background graphics scrolling horizontally, and a plane with the text scrolling vertically. Sounds simple enough, let’s do it!
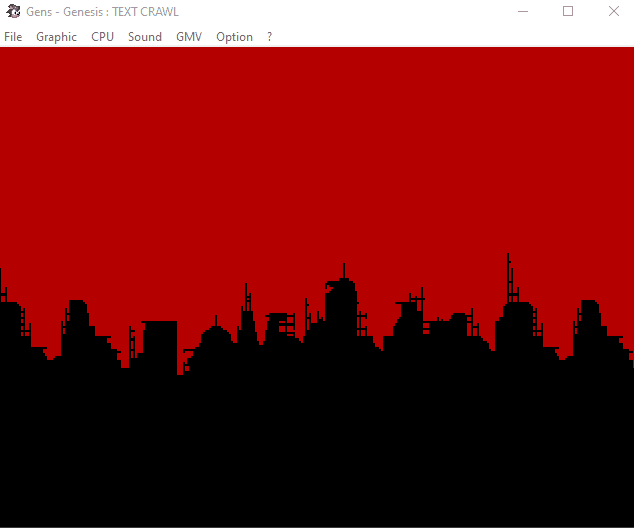
First, download the city graphic below:
Click to download the city graphic (original by TokyoGeisha, modified by me)
Extract it and plop it into the resources folder of your project (probably res) and add it to your list of resources (probably in resources.res) by adding this line:
IMAGE background "city.png" NONE
(If this is going too fast for you, I highly recommend checking out my Megapong tutorial, which explains all the basics of Mega Drive programming with SGDK!)
Now, open your main C file (probably main.c). We’ll now load and draw the image on screen, but before we do that, there’s something very important we need to take care of! At the beginning of main(), add these lines:
VDP_setPlaneSize(32,128,TRUE);
VDP_setTextPlane(BG_A);
The first one will set the size of the two background planes to 32x128 tiles, allowing us to have more lines of text than can fit on one screen. As a tradeoff, we only get 32 tiles horizontally, but since our city graphic will loop seamlessly, that’s not an issue.
The second line will tell SGDK to use plane BG_A for all text. This plane is actually used for text by default, so we don’t have to set it here, but it’s good to know this function exists! And we want BG_A for text because it’s drawn on top of BG_B, meaning we’ll actually be able to read our text. That’s usually a good thing.
Now that we’ve set up the planes, let’s load our city graphic:
VDP_setPaletteColor(0,RGB24_TO_VDPCOLOR(0xA20000)); //Set the background color to red
VDP_loadTileSet(background.tileset,1,DMA); //Load the tileset
VDP_setPalette(PAL1, background.palette->data); //Load the palette of the image into PAL1
And now that we have the tiles loaded in VRAM, let’s draw them all to the screen in one go:
VDP_setTileMapEx(BG_B,background.tilemap,TILE_ATTR_FULL(PAL1,0,FALSE,FALSE,1),0,12,0,0,32,18,DMA);
The number of arguments here might seem a bit confusing, so let’s take a quick look at this function. Its signature is as follows:
bool VDP_setTileMapEx(VDPPlane plane, const TileMap *tilemap, u16 basetile, u16 xp, u16 yp, u16 x, u16 y, u16 w, u16 h, TransferMethod tm);
We pass in the desired plane (BG_B) as well as the tilemap property of our graphic. When importing it, SGDK automatically created this property, which contains information on what 8x8 pixel chunk of the graphic goes where. Remember that everything the Mega Drive displays is split up into 8x8 pixel tiles! This information is then used by VDP_setTileMapEx to properly place each chunk in the right spot.
The xp and yp properties define where on the target plane the graphic will be drawn; we want it at tile-position 0,12. The x and y position specify the first tile of the graphic that we want drawn; in our case, this is simply the very first one (0,0) as we want to draw the whole image, but these properties can be useful if you only want to draw parts of a bigger image. Finally, the w and h properties define the width and height of the graphic to be drawn, respectively.
Writing the Story
Now we have an imposing city graphic as our background. Time to write a story!
This is simple, if a bit tedious. First, create two new helper variables right after our previous tile code:
s16 textPosX = 9;
s16 textPosY = 30;
These will define the starting position of our text. The y-position of 30 will draw our text just below the bottom edge of the screen, so the text will scroll in from outside when we start our game.
Next…well, just draw the text, line by line! This could look like this:
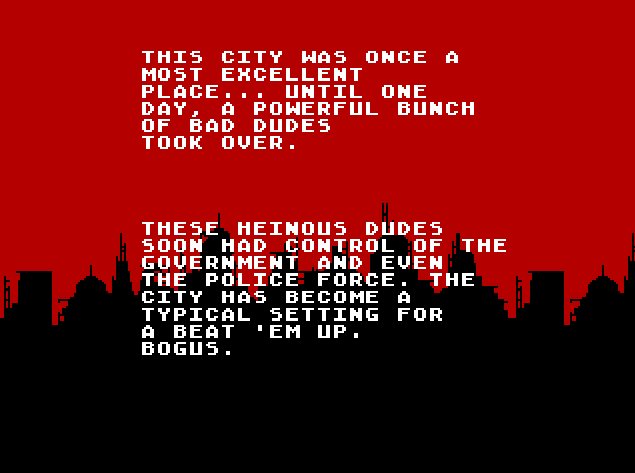
VDP_drawText("THIS CITY WAS ONCE A", textPosX,textPosY);
VDP_drawText("MOST EXCELLENT", textPosX,textPosY+1);
VDP_drawText("PLACE... UNTIL ONE", textPosX,textPosY+2);
VDP_drawText("DAY, A POWERFUL BUNCH", textPosX,textPosY+3);
VDP_drawText("OF BAD DUDES", textPosX,textPosY+4);
VDP_drawText("TOOK OVER.", textPosX,textPosY+5);

VDP_drawText("THESE HEINOUS DUDES", textPosX,textPosY+10);
VDP_drawText("SOON HAD CONTROL OF THE", textPosX,textPosY+11);
VDP_drawText("GOVERNMENT AND EVEN", textPosX,textPosY+12);
VDP_drawText("THE POLICE FORCE. THE", textPosX,textPosY+13);
VDP_drawText("CITY HAS BECOME A", textPosX,textPosY+14);
VDP_drawText("TYPICAL SETTING FOR", textPosX,textPosY+15);
VDP_drawText("A BEAT 'EM UP.", textPosX,textPosY+16);
VDP_drawText("BOGUS.", textPosX,textPosY+17);
Now you can see why we defined our two helper variables: If you wanted to shift the whole text just one tile to the left or up, you’d have to change each and every line. That’s no fun!
But anyway, keep adding lines of text until you’re done. As we’ve set the plane height to 128, you have 128 lines to work with. Now to get things moving!
Scrolling
Before the game loop starts with while(1), add these three lines:
VDP_setScrollingMode(HSCROLL_PLANE,VSCROLL_PLANE);
fix16 offsetX = FIX16(0);
fix16 offsetY = FIX16(0);
The first line will set the scrolling modes to PLANE. As we won’t have any fancy line-scrolling effects here, it’s enough for us to just scroll the planes in their entirety.
The next two lines will store the scrolling offsets of our planes. As you can see, they’re of fix16 type, to give us more control over the scrolling speed. If you’ve never used this type: My Megarunner tutorial will explain how they work!
The actual scrolling is now a simple affair. Simply add these five lines to the game loop:
offsetY = fix16Add(offsetY,FIX16(0.2));
offsetX = fix16Sub(offsetX,FIX16(0.3));

VDP_setHorizontalScroll(BG_B, fix16ToInt( offsetX ));
VDP_setVerticalScroll(BG_A, fix16ToInt( offsetY ));

SYS_doVBlankProcess();
First, we modify our offsets, then we apply them to the planes to get them scrolling. Our text plane (BG_A) will scroll upwards by 0.2 pixels each frame, while our city will scroll to the left by 0.3 pixels each frame. You can adjust these values as you see fit. Just note how we have to convert the offset values to type int before we pass them into the scrolling functions!
And that’s it, actually. Compile the game and marvel at our ominous opening sequence!
Oh, and if you want to add music, I’ve got a tutorial for that too!
Thank you for reading and be excellent to each other!
If you've got problems or questions, join the official SGDK Discord! It's full of people a lot smarter and skilled than me. Of course you're also welcome to just hang out and have fun!

Want To Buy Me a Coffee?
Coffee rules, and it keeps me going! I'll take beer too, though.
Check out the rest of this tutorial series!
Comments
By using the Disqus service you confirm that you have read and agreed to the privacy policy.
comments powered by Disqus